Quantcast
Channel: Review Archives - DearSusan
Viewing all 135 articles
Browse latest View live

#185. A spotty flaw in the Zeiss FE 35/2.8 ZA & Sony A7r combo ?

$
0
0

[Note : This post is part of the ongoing review of the Sony A7r system]

Shooting at low apertures against the produces sun stars that can add a lot to some pictures. The more open the diaphragm, the more blurry (scattered around the frame) the sun’s diffraction patter. Conversely, the less open the diaphragm, the better individual rays appear. 2 for every blade in the diaphragm.

But there seems to be a limit with the Sony A7r & Sony Zeiss FE Sonnar 2,8/35 ZA, as illustrated in the photograph below :(

Spotted reflections ?

Spotted reflections ?

The sun rays are there all right, prolonged by a play of light and shadows in mist produced by the sun’s heat on the morning frost. But so is an unwanted battalion of “spots” surrounding the sun in a geometrical pattern, shown here in high contrast.

I can only imagine the increased depth of field at f/20 has picked up reflections of the sun on the sensor ???

Whatever the reason, this is going to be a post-processing nightmare, if I can get rid of them at all …

It wouldn’t be so bad if these spots only appeared at f/20, but they are plainly visible, although in a more diffused manner at much more mundane apertures, such as f/11. See below, original jpeg :

Sun spots of a new kind ...

Sun spots of a new kind …

This one could be saved with a panoramic crop, but still, there’s a major (coating ?) problem that will pester all those fans of sun stars (probably astronomy fas as well) …

Note that these two pictures also display what Leica Boss called the bullseye colour shift (explanations on how to cure that are in the article).
Any clues ? Sony, perhaps ?

Crop da spots

Crop da spots

Posted on DearSusan by pascaljappy.


#186. Low-light long exposures with the Sony A7r

$
0
0

[Note : This post is part of the ongoing review of the Sony A7r system]

Since my initial review of the  Sony A7r, I have been asked by several readers to perform long exposure tests in low light, with 2 goals in mind :

  • Determine whether the loud shutter could induce vibration
  • Determine how well the camera deals will long exposures and whether in camera noise reduction is needed or not.

While the first condition seemed very unlikely (my impression – at this early point – is that exposures from 1/30 to 1/50 are most affected by vibrations) I set up the camera on a Feisol carbon fiber tripod and Arca Swiss monoball P0 for 30 seconds exposures.

The lens used is the mighty lighty FE T* Sonnar 2,8/35mm ZA reviewed previously with much exhilaration.

Indoors

The first target was a book in a very dark room only lit by a small stove fire and totally unreadable at one meter. Note these 2 files are FULL SIZE (large !) so you can inspect the results for yourselves.

Sony A7r. 30 seconds @ISO 100, no noise reduction.

Sony A7r. 30 seconds @ISO 100, no noise reduction.

Sony A7r. 30 seconds @ISO 100, in camera noise reduction.

Sony A7r. 30 seconds @ISO 100, in camera noise reduction.

What I see is no significant difference at all, and absolutely no shake …

Noise ? What noise ?

Shake ? What shake ? In fact, Jim at The Last Word, performed more scientific tests and found the shutter vibration to be 5 times less than the mirror slap from the Nikon D800.


Note how shallow depth of field is in this configuration (close range, f/2.8, book slightly at an angle) only a top-left bottom-right diagonal showing full resolution. Also note the purple in the background bokeh is due to a purple lamp reflector, not chromatic aberration ;)

Outdoors, let’s find some stars

For this second test, I pushed exposure by 1.7 stops in camera then added +65 contrast and +40 whites in LightRoom. Both pictures shot at 3200 and displayed here at -2,2 stops for aesthetic reasons.

DSC01353

Sony A7r. 20 seconds @ISO 3200, no noise reduction.

DSC01354

Sony A7r. 20 seconds @ISO 3200, in camera noise reduction.

Below are 2 enlargements of the central region without the 2,2 stop darkening (as shot). But you need no enlargement to notice the effects of noise reduction :

Strong purple fringes appear around bright stars. They look more like sensor blooming than chromatic aberration to me but I have no certainty of this. At any rate, NR ges rid of them and might keep the background a tad cleaner (sorry about the so-so focus, it was dark ;) )

LongExp-noNR

LongExp-NR

Bonus track : the Zeiss FE Sonnar T* 2.8/35mm ZA for astrophotography

Largely but not totally unrelated to theoriginal request, here is a crop of the top right corner of the frame to show how well coma is controlled in this lens’s design. And the answer is : exellently.

Very little coma. Click for 100%

Very little coma. Click for 100%


Please share the love with the social buttons below. It don’t cost much and it helps Suzie along.

Posted on DearSusan by pascaljappy.

#190. Leica Apo-Telyt 135/3.4 (on Sony A7r) : the Long Ranger

$
0
0

Long lenses suit the way I see the world better than wide-angles do, so let me begin my reviewing of Leica lenses on the A7r with my most recent acquisition : the Leica-M Apo-Telyt 135mm f/3.4.

I purchased this used from Schouten Select. It is a fairly expensive lens (over 2000€ for good samples) that competes head to head with much more modern designs such as the mighty Zeiss Apo Sonnar T* 135/2, which ranks as one of the best lenses ever designed for this format. So how does it fare on the A7r ?

Leica Apo-Telyt-M 135/3.4 on Sony A7r

Leica Apo-Telyt-M 135/3.4 on Sony A7r

Truth be told, it looks slightly priapic on the small Sony. Definitely happy to be shooting ;) It’s certainly not a lens you’d dangle on the camera around your neck all day long.

But, in hand, it feels perfect and never unbalanced. It’s light, smooth and accurate. The sliding shade is a dream and the lens cap fits perfectly (which is not something the Zeiss competition can say …) All controls are positive and precise.

How anyone uses this on a M9 is beyond me as focus depth is hair thin even at infinity and closed down. The A7r’s 14x focus magnification and focus peaking are a god send for critical focus and even with these handy tools, rigorous technique is essential. Any trembling of your hand sends huge wobbles through the magnified viewfinder, so you soon learn to brace yourself and breathe like a Zen master when using this Apo-Telyt.

Perfect MTF curves

Perfect MTF curves

All this concentration is well worth the effort, though. The Apo-Telyt-M 135/3.4 is an optical gem. The essentially perfect MTF curves tell only part of the story. This lens exhibits the tiniest bit of rolloff that controls highlights beautifully and eliminates harshness from most scenes. Its signature is lovely to the eyes of yours truly. The picture below is a testament to the quality of this lens (detail detail everywhere but all in a smooth consistent picture) and the Sony’s sensor (contrast has been boosted very strongly and the image doesn’t break up).

Note that the MTF curves for the Zeiss Apo-Sonnar T* 135/2 are almost identical at f/2 and F/4 than the ones above at f/3.4 and f/8. Impressive, to say the least. But the Zeiss makes a fire extinguisher look and feel small ;) Ah, compromises …

DSC01710-Modifier

I’m not a technical reviewer, far preferring real-world situations. So here are some scenes aimed at highlighting some of the qualities of this lens :

  • Highlight and flare management
  • OK Bokeh
  • Insane sharpness
  • Micro contrast

Into the sun

DSC01747-Modifier-5

Stormy sunset – Sony A7r & Leica Apo-Telyt-M 135/3.4

The photograph above is a heavily processed sunset shot from my bedroom window. Below are two 100% enlargements from the area around the sun and at the lower left border.
DSC01747-2I find this first picture particularly impressive (try this with your average 28-300 kit zoom). Millimeters away from where the sensor is saturated, it’s like the sun isn’t even in the frame. Contrast is stunning. Colours are perfect. Everything is clean as a whistle. The silhouette of the tree to the left of the sun is not totally black but that’s about all the light dispersion you can spot in the whole frame. A+ performance. And sharpness isn’t bad ! (be sure to click for a 100% view).

DSC01747-3The second enlargement simply illustrates sharpness and contrast away from center and in difficult conditions (darkness and against the sun). If you click, you’re essentially looking at a 6 foot print. Unprocessed and at max aperture. Good enough ? ;)

Bokay, okay

Bokeh is subjective. On this lens, it isn’t swirly or special in any way. Planes simply come into or out of focus through a progressive variation of sharpness mostly with no added nasties.

Led bokeh - Sony A7r & Leica APO-Telyt-M 135/3.4

Led bokeh – Sony A7r & Leica APO-Telyt-M 135/3.4

Agitated bokeh can often be detected by examining how out of focus highlights are rendered. Severe onion rings or bright rims often lead to nervousness in contrasty backgrounds. There is nothing like that to complain about with this lens.

On real-life subjects, bokeh it is a bit more harsh than I’d have liked, even at full aperture, though not excessively so.

DSC02066-2

Great subject isolation

Sharpness

The enlargement below shows exactly how sharp this lens can be. I’ve no technical info about this, but it seems ever sharper at close range than infinity.

DSC02066

Stellar sharpness at 100% (click for full size)

And two more shots just for fun :)

Face of Sainte Victoire 1 - Sony A7r & Leica-M Apo-Telyt 3.4/135mm

Face of Sainte Victoire 1 – Sony A7r & Leica-M Apo-Telyt 3.4/135mm

Low contrast scenes

If this lens can falter slightly, it is on low contrast scenes, such as winter landscapes in miserable light.

DSC01824In those conditions, the Apo-Telyt sometimes lacks the strong micro contrast that the best Zeiss will provide. Pushing clarity in post-processing works to some extent, but the results can look a tad more artificial than with a lens of a more modern design.

It’s no inherent flaw of the lens, simply a design choice that makes it brilliant in contrasty situations but requires a little more work in drab conditions, particularly if you’re post processing in B&W.

Verdict

I’ve never used the Zeiss Apo-Sonnar T* 135/2 on a Sony A7r so any comparisons with the Leica lens under review would be flawed.

But from my experience of top modern Zeiss glass on the Nikon D800e, I’m tempted to say the Zeiss would have the edge over the Leica in low contrast situations. Besides, the Zeiss offers almost two stops of extra aperture with no loss of quality and at a lower price. I really hope to get my hands on one soon to compare the two.

But a photographer wouldn’t compare these two lenses on technical criteria. They are too close for meaningful differences to sway you one way or another.

DSC01770

Frozen rain – Sony A7r & Leica Apo-Telyt-M 135/3.4

What matters more is the look produced by these two master stroke lenses, with the Leica’s perfectly summed up in the photograph above, taken during a burst of sunlight in a heavy rain storm.

Detail is everywhere but never in your face (at 100%, tiny detail on the red leaves in the background are visible between the drops). Colours are strong but subtle. Highlights are always in check. Out of focus areas display little or no harshness.

Compared to the Zeiss, it’s like printing on Satin paper rather than gloss. And that suits me perfectly. But others prefer the bolder colours and higher micro contrast of high gloss and Zeiss. Both these lenses will suit the A7r perfectly and make the most of its great sensor!

Isn’t it a perfect situation when a photographer can choose his lenses based only on the rendering he/she prefers rather than on technical limitations ?

Posted on DearSusan by pascaljappy.

#191. Leica Summicron-R 50/2 : the perfect 50 for the Sony A7r ?

$
0
0

It was this lovely article by Tim ashley that brought this lens to my attention. I bought one for my NEX-5n 18 months ago, didn’t love it as much as I had hoped (chiefly because of the resulting 75mm equivalent focal length), sold it to a fellow photographer reader of Dear Susan, then bought it back from the same person for use on the Nikon D800e.

Sainte Victoire Farmstead - Sony A7r & Leica Summicron-R 50/2

Sainte Victoire Farmstead – Sony A7r & Leica Summicron-R 50/2

For use on the Nikon D800e, the lens was modified with a Leitax mount in a few minutes and rapidly became a favourite.

When I sold the D800e and switched to the Sony A7r, the Leitax mount remained and a Nikon adapter lets me use both Zeiss ZF2 and Leitax mount Leica-R lenses. It worried me initially that all this mechanical juggling might reak havoc with the optical quality but this simply hasn’t been the same and I can cut the review short by stating the Leica Summicron-R 50mm f/2 is a lovely lens for the A7r.

Leitaxing your way to Nirvana

Leitaxing your way to Nirvana

In hand

Perfect ! Small is beautiful, but great ergonomics are more beautiful, in my book. And ergonomics are perfect on this lens. Mounted on the Nikon adapter,it certainly protrudes more than an M-mount equivalent, though no more than the FE 55/1.8, and matches the sensor way better.

Plus the lens itself is every bit as light and small to carry in your bag.

Sharpness

Natural Oppidum - Sony A7r & Leica-R Summicron 50

Natural Oppidum – Sony A7r & Leica-R Summicron 50

Very slightly soft in the corners (also see the veil), it is razor sharp from f/4 onwards. A fabulous lens for the chart peepers.

Vignetting

Nothing of significance.

Flare resistance

This is one area where most Leica-R lenses show their age, compared to the best in the industry.

DSC01995Flare is present, though no more so than the otherwise perfect Zeiss FE 35/2.8 and usually easy to escape by using your hand as a shade. The real issue is veiling glare with the sun near the borders of the frame, as displayed below.

Flare

Poetic veil

Here’s the scary part for many. Wide open, this lens adds a distinct glow to the scene. It isn’t unsharp as many lesser lenses go at max aperture, but detail is bathed in a halo.

At 100%, it could send the lab minded reader running for cover, so I’ll start with the global view ;)

Cliffs 'n cloud - Sony A7r & Leica Summicron-R 50/2

Cliffs ‘n cloud – Sony A7r & Leica Summicron-R 50/2

Compare the bluntly factual rendering of Natural Oppidum in the sharpness section to Cliffs ‘n Cloud above.

That change in personality is one of the beauties of this lens.

Below is an enlargement of the most extreme “veil” I have found so far. It will scare some and endear others. As you cant tell detail is there in spades, in spite of the veil.

DSC01977-2A less extreme example (still at f/2) is below. You can download the complete file (7Mb jpg) to see for yourself what the veil looks like most often. I added the vignetting, the lens has very little.

Wood and Stone - Sony A7r & Leica 50mm f/2 Summicron R

Wood and Stone – Sony A7r & Leica 50mm f/2 Summicron R

A note to pixel peepers. This is roughly 5 feet wide and corners are out of focus, not blurry.

Bokeh

In classic close foreground – distant background situation, bokeh is just lovely (the picture below was made on the Sony Nex-5n).

A cat looking intently at something, Sony NEX-5N & Leica Summicron-R 50At further distances, it looks lovely on the whole, with a slightly bubbly quality at 100%.

Mountain chapel in the Sainte Victoire - Sony A7r & Leica Summicron-R 50

Mountain chapel – Sony A7r & Leica Summicron-R 50 @ f/2

DSC01972-2

bubbly bokeh at 100% (f/2)

DSC01967

Chapel and hill – Sony A7r & Leica R Summicron 50 @f/8

Colour

Out of camera, I find the colour from this lens a tad subdued. But increasing saturation or vibrance soon brings this back to more exciting levels and never looks artificial. So, colour: good.

MossyNook

Mossy nook – Sony A7r & Leica R Con 50

Not so yummy is the slight colour cast when you close down from full aperture to f/8.
DSC01959
Warm and glowing at f/2. Darker and with a slightly colder hue at f/8.

DSC01958Verdict

Here’s a lens that costs roughly 10% as much as an OTUS 55 yet provides performance in the same ball park at f/8. Wide open, it’s likely nowhere close, in a lab. But there is detail in abundance, even wide open, and that poetic glow, as Tim Ashley calls it, gives the lens a true personality without the glaring flaws of other “artist lenses”.

The only alternative I’d be interested it at this point it the Zeiss 50/1.4 ZA but that’s a much bigger hunk of glass and it costs 4 times the price. So …

The Zeiss Planar 50/2 ZM is also a darling, but it suffers a great deal more in the corners.

The Zeiss C-Sonnar also comes to mind, with even nicer bokeh but a more costly sacrifice in sharpness compared to the Cron-R.

An OTUS would be nice as well, if I’m honest ;)


Please share the love with the social buttons below. It don’t cost much and it helps Suzie along.

Posted on DearSusan by pascaljappy.

#201. On test: Nikon 50mm f1.4

$
0
0
Spring snow melt - f16 @ 1/4s

Spring snow melt – f16 @ 1/4s

Nikon moves ahead – it’s full frame camera line-up is currently topped by the D800e and the soon-to-be announced D4something.

The big N has done a similar job with it’s lenses, delivering increasingly interesting glassware for the serious amateur and pro alike. Clearly, this isn’t altruism, more an attempt to fend off the charge of wannabes like Zeiss and Sigma, who have released some serious competition in recent months.

An almost perfect triangle - f11 @ 1/8s

An almost perfect triangle – f11 @ 1/8s

Well, yahoo. I’d love one of those German bazookas too, but that’s my photo hormones speaking. Maybe, the last thing I need is yet another 50mm prime for ridiculous money – perhaps I should go and guddle in the cupboard, where if memory serves, I have one already.

Quiet waves, Kogel Bay - f16 @ 0.5s

Quiet waves, Kogel Bay – f16 @ 0.5s

In an age where Nikon’s professional zooms dominate, the idea of a 50mm prime is really an anachronism isn’t it? Here’s mine. Ex-eBay where it cost $96. It’s focus mechanism is well worn, almost slack. It’s aperture perfect, glass crystal clear. For slightly less than $100 who could complain about that?

50mm f1.4 snug on my d800e

50mm f1.4 snug on my d800e

On my D800, the mount is tight and while there’s no focus peaking, there is a focus finder which together with the multi-selector driven focus point display in the viewfinder, works almost as well.

Sea mount - f16 @ 1/6s

Sea mount – f16 @ 1/6s

Remember, I’m not shooting fast moving action. These images are invariably the more intimate type of landscape, where time is not only available for setting-up the shot, it’s preferable to get the job done properly.

There’s even a depth of field scale on the lens barrel, something missing on many newer lenses and for me, a critical piece of information, although I’d be the first to admit to not yet being able to use it properly yet.

Wave surge - f11 @ 1/5s

Wave surge – f11 @ 1/5s

According to the serial number, it is an AIs lens made some time between July 1981 and December 2005. My guess it was very much nearer the former, but who cares – when I’ve got my act together behind the viewfinder, it’s a fantastic piece of kit.

As a photographer used to zooming to fit the frame, using a prime takes a bit of getting used to, especially the field of view, which is supposed to mimic that of the human eye. I don’t know about that, but do find myself setting-up, reaching for the 28mm and then discovering it’s too wide for the shot I want and turning to the 50 instead.

This image is a scene I’ve been trying to capture for several weeks. It’s a natural ravine with a large white rock at the bottom right. The wide angle renders the scene too wide and as a result, includes the skyline at the top. The 50 solves that, giving me the perspective I want.

The elusive ravine; not quite right yet

The elusive ravine; not quite right yet

I’m still not happy with this view though and plan to go back to the scene – about 5km from my home – when the conditions are once again right. At least I know that I won’t have to drag much kit along; D800, the 50 and a tripod will do, I think.

I’ve always found Pascal and Philippe’s lens reviews informative and hands-on and now, here’s one of mine. That’s it’s not altogether honest in it’s introduction was in order to generate interest and from my perspective, bring in some response. So, there it is – a junk shop lens for less than $100 that delivers fantastic results. It snuggles in my bag alongside a 28 f2.8 and a 105 f2.5, both of similar vintage. I’ll write about them too if you’d like.

Fence post and gentle bokeh - f1.4 @ 1/250s

Fence post and gentle bokeh – f1.4 @ 1/250s

There’s a whole lot more to say, but I’ll content myself with this; when I bought my first Nikon F in late 1974, it came with a 50mm f2 lens. There was a reason for that which after forty years, I’m beginning to understand. In short, if you don’t have a 50, I’d suggest you give yourself a treat and get one to try.

Dried kelp - f16 @ 1/30s

Dried kelp – f16 @ 1/30s

Posted on DearSusan by paulperton.

#206. Leica Elmarit-R 19/2.8 – superwide on steroids for the Sony A7r

$
0
0

Generally speaking, Leica-R lenses are a well kept secret, yet produce brilliant results on the Sony 7r. But this Elmarit-R 19mm version II is definitely at the top of the quality list.

Boats and old buildings under blue sky in the old port of La Ciotat, Provence, France. Sony A7r & Leica Elmarit-R 19mm f/2.8

The old port of La Ciotat, Provence, France. Sony A7r & Leica Elmarit-R 19mm f/2.8 (click for full size image)

At f/8, it is more or less the perfect lens. Easy to say, I know. But as a strong supporter of the removal of AA-filters from cameras, I have been quite vocal in the past about moiré being a false problem and never appearing in real-life situations. Well, here’s one shot with moiré, showing the ultrawide lens outresolves the 36Mpix sensor … in the corners.

The image above is largely untouched out-of-camera. You can download the full-size file by clicking on it (7Mb large file). Look in the top left corner and you will see definite moiré on the white shutters. It is much more evident and colourful in the RAW file than this heavily compressed jpeg shows.

Colours are also very lifelike, distortion very low. If you’re in the very wide-angle market for Sony’s A7r, get one, while stocks last. The end!

For those interested in a bit more information – and a couple of flaws – there’s more ;)

Ultra-wide?

When I compared this lens on a Sony NEX-5n to co-author Philippe’s Zeiss 18mm, the difference in FOV semed far greater than 1mm of focal length indicated. 19mm might well be an optimistic figure for this lens.

Cliffs falling into the sea in La Ciotat

Cliff trio – Sony A7r & Leica R Elmarit 19/2.8

Nonetheless, I was still in two minds about keeping it, not having ever used anything this wide (on FF) before and being unsure I would be able to make good use it. I mean, in the picture above, the yellow stones were not far in front of my feet and the cliff required a definite upwards twist of the neck. A field of view new to me and a bit of a specialty lens, to my eyes. But it is so good, I’ll just have to go back to school and learn to use it to its full extent :)

Anything bad to say ?

Flare control is the single most obvious characteristic of Leica-R glass that reveals the range’s age. And this wide-angle is no exceptions. While coatings are good enough for very transparent looking images, placing the sun in or around the frame will induce strong flaring from the R19. And with that sort of field of view, keeping the sun out of sight doesn’t leave you much sky to play with. If flare control is a deal breaker, this is not the lens for you.

The sun in the frame produces strong flaring with the Leica Elmarit R 19mm

Major Sun to flare control – Sony A7r & Leica Elmarit-R 19 / 2.8

The picture above represents the worst-scenario, wide open at F/2.8 and with the bottom of the frame in the shadows. In this specific image, you could argue the flare circles contribute something to the pictures, but it won’t always be as pleasant.

I have a second, more puzzling, negative to report. A larger-than-average proportion of my photographs were out of focus with this lens. Slightly ironic considering the depth of field a 19mm should have on offer at f/8. But that may actually be too much for focus peaking to handle efficiently and I advise you use the magnifier on every important shot for a fail-safe solution.

Now for the good stuff

Colour rendition is subjective. I personally find it absolutely superb. For me, the main justification for leaving the Canikon stables and hop into alt photography wonderland is the quantum leap in colour quality that some of the legacy lenses floating around the internet will give you over the most recent offering from the major stables from Japan. Ever since my first taste of Voigtlander fun on a Sony NEX-5n, I have been hooked and never looked back. And during my year with a Nikon D800e, all my lenses were Leica-R. To my eyes, they’re the key to a different world where artists take over from lab rats dressed in grey (Monty Python anyone ?)

Yellow graffito - Sony A7r & Leica Elmarit-R 19:: f/2.8

Yellow graffito – Sony A7r & Leica Elmarit-R 19mm f/2.8

If you’re reading this in a non colour-aware navigator on an average laptop screen, you’ll think I’m talking nonsense. But on a great screen and in print, the difference isn’t subtle.

Pale greenn acti on a slope of yellow stones

Cacti on a slope – Sony A7r & Leica-R Elmarit 19mm f/2.8

Sharpness: more or less perfect across the frame at f/8, it isn’t as impressive at full aperture. f/2.8 is visibly softer in the corners but the good news is that this appears quite uniform and progressive across the frame rather than sinking suddenly at the edges as some designs do. All in all, excellent performance from such a wide-angle.

Contrast: this is another Leica-R strong point. Contrast is lovely in that scenes in flat light do not appear drab, but is also well controlled. This is a superb lens for B&W. Highlights are rarely blown and the general look is dynamic but refined. Amateurs of ultra punchy lenses such as the Zeiss 21/2.8 ZF2 will not find the same impact, but this is more to my taste.

A classic wooden yacht in the old port of La Ciotat

Yachting – Sony A7r & Leica R Elmarit 19mm/2.8

Bokeh probably shouldn’t be your first concern with a 19mm lens, but it’s always possible to throw a lot out of focus with a Leica-R given how close these gems can focus. Bokeh is highly subjective. To the eyes of yours truly, it deserves a solid B+. Generally smooth, with no nasties on specular highlights, but a tad bubbly and agitated compared to the best in class performers.

DSC04624

Vignetting: specs rate max vignetting at over 2 stops. In real-life it doesn’t look so bad and definitely shouldn’t stop you using the lens at full aperture. Below are two shots processed identically made at f/2.8 anf f/8. Vigneting is there, but not in any disturbing amounts. Also good is the absence of colour and focus shift as you close down!

DSC04613 DSC04615

Purple fringing: Chromatic aberration becomes visible on extreme contrast zones such as white masts in the sun against a dark sky. But none of my test frames have required correction.

DSC04606-Modifier

Leica R 19 on Sony A7r : Closing thoughts

In hand, the Leica Elmarit-R 19mm f/2.8 version II is superb. The rectangular lens shade makes you feel like you’re Stanley Kubrick, focus is absolutely perfect with a fantastic mix of precision, weight and smoothness. And the aperture ring feels very tight and positive between the half-stop clicks (for those who still know what an aperture ring is).

On a Novoflex adapter (thank you Philippe for ending my misery and lending me one) the lens protrudes quite significantly, but the controls are perfectly placed (much more accessible than if no adapter was used) and the adapter soon becomes the natural handle for the whole camera system. Perfect.

As I wrote above, this is a great lens for fans of B&W. The way it controls highlights in very sunny situations is wonderful and shadows are full of detail as well.

But it’s the most shallow of all features – one I shouldn’t even care about – that make this old trooper stand out from the M-mount alternatives : sharpness. The medium-tele photo below is in fact a very severe crop from a R19 file.

DSC04623

I initially had reservations about such a wide-angle lens but, after a day of shooting with nothing else, the need to quickly switch back to more familiar ground never appeared. In fact, the lens is still on my camera 4 days later …

Be seeing you :)


Posted on DearSusan by pascaljappy.

#210. The Leica Macro-Elmarit-R 60/2.8, the soulful engineer

$
0
0

Some lenses are clearly designed with specialists in mind, while others can shine at any challenge you throw at them. The Leica Macro-Elmarit-R 60mm f/2.8 is (almost) one such lens.

A fire explosion on a cinema set photographed with a Sony A7r & Leica Macro-Elmarit-R 60/2.8

Fire & Water – Sony A7r & Leica Macro-Elmarit-R 60/2.8

It focuses right up to 30cm from the sensor (15cm from the front lens), which equates to a 1:2 reproduction ratio. A figure that can be doubled to 1:1 with a dedicated extension tube. But it’s just as happy with landscape, where it’s subtle reproduction of tone and colour will find favor with the naturalist and all those looking to presevre data for post-processing rather than push the limits in camera.

The king of subtlety

Below is photograph that pretty much sums up what you’re getting with this lens.

Numbers on a house wall - Sony A7r & Leica R60/28

Fahrenheit 751 – Sony A7r & Leica R60/28

  • The colour, untouched in post processing, is spot on.
  • Detail throughout the frame is fantastic. This is f/8 and at close range. More later on other situations.
  • The focus plane is perfectly flat (as a plane should be ;) )
  • Highlights are well preserved, although this is largely due to the A7R’s tendency to under-expose.
  • Nothing is in your face, the rendering is very natural, yet full of zest.
Sharpness

At f/2.8, a hint of the artistic veil so characteristic of Leica’s Summicron-R 50 (reviewed here) is present in the highlights, though nowhere near as pronounced. See the 100% enlargement below at f/2.8.

Click for 100% view (center of the frame).

Click for 100% view (center of the frame).

So micro-contrast is slightly low compared to more modern alternatives. But detail is abundant (the picture above is unsharpened at full aperture and the entire frame roughly 6-foot wide, at typical screen resolution).

Wide-open, life is not quite a sexy in the corners, but still very acceptable. In the enlargement below (again 100%), focus is on the top row of tiles, so the grass looks worse than it would if it was in focus.

Bottom-right corner - Leica Macro-Elmarit-R 60 at f/2.8

Bottom-right corner – Leica Macro-Elmarit-R 60 at f/2.8

Shut-down, this lens is almost perfect. Micro contrast is down on modern Zeiss glass such as the mighty FE 55/1.8. But the image is very detailed at any distance and very natural looking.

Colour

What can I say? Perfectly natural out of the box. The lens is a *perfect* match for the Sony A7r in that any respective casts seem to cancel out and produce very natural and pleasing results without any enhancements being required.

Did I say natural ? The Macro-Elmarit-R can also rock. Take it to a concert and go wild.

Did I say natural ? The Macro-Elmarit-R can also rock. Take it to a concert and go wild.

Of course, this combo also packs so much data in a file that you can go berzerk with the sliders without the image breaking up at all. Even on a camera as brilliant as the A7r, this is not true of all lenses.

Natural blue ?

Natural blue ?

Macro

I’m officially the worst (uninterested) reviewer of macro lenses, so let’s skip over this briefly.

If you’re willing to set up a strong tripod, face the task of finicky focusing and work lighting like a pro, I hear this lens will reward the effort in spades.

Close-up Yum at f/2.8 (sugar balls less than 1mm in diameter)

Close-up Yum at f/2.8 (sugar balls less than 1mm in diameter)

If, like me, you just plonk cup-cakes on a table by a window, hand-hold and breathe smoothly, it ain’t bad either. F/2.8 above/ F/11 below. Both are (large) *full-size* files if you wish to inspect at 100%.

Close-up Yum at f/11 (sugar balls still very small)

Close-up Yum at f/11 (sugar balls still very small)

Yum, right?

Bokeh

Sweet. This Leica R macro lens is not a bokeh king. Nor does it isolate subjects in a 3D-pop sort of way like the specialists do, but what bokeh it does offer is  very smooth and pleasant. This was unexpected and a nice surprise.

A bronze statue of an ownl in a derilict building - Sony A7r & Leica Macro-Elmarit 60/2.8

Distortion

Here is one righteous lens. Architects and engineers must love it. Even if you do not fall into one of these categories, you will be happy to come home with a card full of photographs that do not require post-processing to look right. This never feels clinical, however. The lens just acts natural, adding no unwanted geometry to the scene. Anyone ever confronted to mustache distortion will hop with glee.

This totally untouched and totally boring shot of a gate shows what I mean.

Call me Bill

Call me Bill

This lack of distortion may seem unimportant in an age of in-camera correction. And that’s partly true. But remember that even the best digital image manipulation is by nature destructive and I think the very natural look produced by this macro 60 is largely due to the fact that so little has to be corrected after the shot is made.

Flare

Time to trip over … This is a 30+ year-old Leica R. It takes flaring to heart …

That said, I actually had to make it flare to show you and this almost never happens in real-life sessions. The deeply recessed front lens, narrow-ish field of view and good (though not excellent by modern standards) coating mean you very rarely get into trouble.

Leica R Macro Elmarit 60mm f/2.8 worst case flare at f/2.8

Leica R Macro Elmarit 60mm f/2.8 worst case flare at f/2.8

If you do, this is what it looks like. F/2.8 above, F/8 below.

Leica R 60mm f/2.8 Macro Elmarit worst case flare at f/8

Leica R 60mm f/2.8 Macro Elmarit worst case flare at f/8

The great news is A+ control of contrast and glare. Sunlight doesn’t spread around the frame to damage shadows. Remarkable.

100% view of the sun behind an electric post. 60mm f/2.8 Macro Elmarit on Sony A7r

100% extract of the sun behind an electric post. 60mm f/2.8 Macro Elmarit on Sony A7r

Build and ergonomics

The lens reviewed is numbered 315XXXX, indicating production in 1981. It shows some signs of use and wear on the ring metal groves. But close your eyes and you’ll swear you are using a brand new toy. Everything about it is taut and buttery smooth. Focusing is pure joy.

Built like the proverbial outhouse, the Leica Macro-Elmarit-R will never let you down.

Built like the proverbial outhouse, the Leica Macro-Elmarit-R will never let you down.

It comes with a screw-on cap that is both a blessing and a pain.

On the negative side, it takes ages to remove so you’ll likely leave it off most of the time, which is not a danger since the front lens is so deeply recessed. But when you need to react fast, and the cap is till on, believe you me, you will let a few four letter words run free in frustration.

The happy flip is that if anything damages the lens through this cap, well … you probably won’t be around to lament about it. It is thick, solid and reassuring metal that will take whatever you throw at it.

Ergonomics and build are a clear cut above anything I have ever used form any other stable. Good ’nuff?

Conclusion

Should you buy one? Well, I have 2 things to say about this :

  1. If you have a great friend such as Philippe who lends you one to play with, then, life is good :) So thank you Philippe :)
  2. If you don’t, this is a great lens at a very reasonable price (less than 500€), particularly for the nature photographer. It will require very little post-processing effort for natural-looking pictures, doesn’t get in the way with an unwanted signature if you’re feeling creative, and is never bland.

DSC04723-2

Some will miss the last drops of micro contrast that more modern lenses provide. The Summicron-R 50/2 might offer at tad more sharpness at f/8 (and one extra stop of light gathering and smaller size) but is clearly more of a specialist lens. The FE 55mm is technically superior in almost every way except colour. But build, price, durability and ‘soul’ go to the Leica.

If this was a HiFi amp, it would be a class-T, with almost the accuracy of the best digital amps yet with the natural tones of well-fed monotriodes. If these characteristics work for you, you really cannot go wrong with this soulful engineer.


Please share the love with the social buttons below. It don’t cost much and it helps Suzie along.

Posted on DearSusan by pascaljappy.

#212. The Sony FE55 in Tibet: A Winters Tale

$
0
0

This is a guest post by Philip Partridge about his recent experience with the Sony A7r and the Zeiss FE 55/1.8 in Tibet. I hope you enjoy reading it as much as I did and that Philip will be back with more :)


After some reliable reviews of the new FE 55mm f1.8 ZA (or FE55) appeared I realised that the a7r with this lens could be valuable in shooting Tibet’s huge vistas and ancient monasteries. In conjunction with an RX1, it could effectively replace two regular lenses I used on my travels, saving significant weight and bulk. The subject matter for a travel photographer in Tibet is diverse:

  • open landscapes, often huge vistas in the clear air;
  • portraits of nomads and street life in the burgeoning urban centres of Lhasa, Shigatse and Gyantse;
  • ‘portraits’ of the remarkable monasteries (or gompas); and
  • the centuries old statuary, murals and religious artifacts in the dim, often unlit interiors of temples.

Sony’s recent small full frame cameras are a godsend to travel photographers, not least because of the large strides made recently by Sony in high ISO quality, color handling and resolution.

ISO 2500, f4, 1/800s – 100%crop - (c) Philip Partridge

ISO 2500, f4, 1/800s – 100%crop – (c) Philip Partridge

ISO 125, f10, 1/320s – 100%crop - (c) Philip Partridge

ISO 125, f10, 1/320s – 100%crop – (c) Philip Partridge

What Kind of Lens is the FE55?

The FE55 is recognised by the lens testing community as being technically the best normal focal length lens ever produced, with the exception of the very heavy, very large, manual focus Zeiss Otus. It has very good control over the aberrations that most afflict our images: distortion, lateral CA, astigmatism and importantly, field curvature. It features a new kind of design for a lens of normal focal length (those between 50mm-60mm). It has most in common with high end macro lenses such as Leica’s under-rated Macro-Elmarit-R 60mm f2.8, except the FE55 gets into stride two or more stops earlier in its aperture range. It also closely resembles the performance profile of the best short telephoto lenses (85mm-100mm). While the photo world views the FE55 as technically excellent, some enthusiasts have expressed the subjective opinion that it has a clinical rendering, is soulless, has less than ideal bokeh and lacks ‘mojo’. These are personal views obviously, and viewers can make up their own minds. I find the FE55 images to have very high photorealism – that elusive sense of ‘being there’.

So how did it go? – The FE55 in the Field

Having used the FE55 intensively in real world usage to shoot over 1500 images in a recent winter trip to Tibet here is how I see it: Performance is already very solid at f2, which is often a far better aperture for focus fade characteristics than the faster lenses many of us crave.

Samding - ISO 4000, f2.2, 1/200s - (c) Philip Partridge

Samding – ISO 4000, f2.2, 1/200s – (c) Philip Partridge

Performance jumps considerably at f2.8 and the lens gives its considerable best at f5.6. F8-f11 are wonderfully suited to deep landscapes.

Phunt - ISO 160, f11, 1/250s - (c) Philip Partridge

Phunt – ISO 160, f11, 1/250s – (c) Philip Partridge

Focus fade just off the focal plane and bokeh character are sure to please the majority of photographers. The FE55 produces a very pleasing rendition of out of focus subjects, which will be gratifying to the design team. Skin tones are some of the best I’ve seen from a digital camera. I shoot Auto White Balance exclusively, and adjust a little in ACR.

ISO 2500, f2, 1/400s - (c) Philip Patridge

ISO 2500, f2, 1/400s – (c) Philip Patridge

Ramoche - ISO 2500, f4, 1/800s – 100%crop - (c) Philip Partridge

Ramoche – ISO 2500, f4, 1/800s – 100%crop – (c) Philip Partridge

Colour tonality is very well controlled and subtle, even in punishing low ambient light levels (none of the images here used flash). Clean grey tones can coexist with attractive strong colours. Sony’s signal processing is a big factor here, but the character of the lens works harmoniously with it. The colour tone handling and cross frame microcontrast are more important to me than the final gain in sharpness in the FE55.

Gyanste - ISO 5000, f1.8, 1/60s - (c) Philip Partridge

Gyanste – ISO 5000, f1.8, 1/60s – (c) Philip Partridge

ISO 6400, f2, 1/80s - (c) Philip Partridge

ISO 6400, f2, 1/80s – (c) Philip Partridge

AF speed is more than acceptable in good light and requires up to one second in poor light to lock on to the subject. Poor light to me is ISO 6400, f2 and 1/60s or shorter. Accuracy of AF is first rate, and it helps to hold the camera very still while focus in being acquired.

Already at f2 the FE55 provides for a very gradual fall off in performance across the frame, so you can place subjects off centre and still obtain consistent and high levels of sharpness. It also means that once you become familiar with the loss of main subject focus when using the ‘focus then recompose’ method, you can intuitively predict the results. Moving the AF spot to the subject within the final composition is of course preferable but to do this you need time that is often not available. Sony’s EVF instant image review can be invaluable for ‘one chance only’ shots.

Shalu - ISO 6400, f2.2, 1/60s - (c) Philip Partridge

Shalu – ISO 6400, f2.2, 1/60s – (c) Philip Partridge

The FE55′s low level of field curvature is as valuable as it is unusual in a normal lens because it can be difficult even for very experienced practitioners to guesstimate the effects of field curvature in a given composition, and the sudden drop in resolution can play havoc with portraying many subjects.

For example, lenses with high levels of field curvature may cause one side of a person’s face to be blurred while the other side is very sharp; or a body of water loses definition in mid frame only to become very sharp in the corners at the same focus distance. These problems are virtually absent in the FE55. The result is you can shoot strictly planar subjects like wall murals and building facades with confidence, and all other compositions also benefit, even if this is not apparent.

Samding - ISO 160, f9, 1/160s - (c) Philip Partridge

Samding – ISO 160, f9, 1/160s – (c) Philip Partridge

For landscape work F8 is my most used aperture, and I don’t hesitate to use f11 or even f13 if very deep depth of field is needed. This is a another major benefit of unfashionably slow yet high performance lenses with flat fields: the performance drop off at small apertures is reduced, and as the starting point is higher you can easily use smaller apertures with little penalty – even on a demanding camera like the a7r. The FE55 has better corners at f16 than the FE35 has at f11 for example, both mounted on the a7r.

Zhangmu - ISO 125, f10, 1/320s - (c) Philip Partridge

Zhangmu – ISO 125, f10, 1/320s – (c) Philip Partridge

Ergonomics

It may be sacrilegious to some, but the lack of an aperture ring adds greatly to the usability of the FE55. The rear section of the lens gives the left hand a good position to hold the lens for the balance the a7r needs, and it means the camera can be operated solely with the right hand. This is a big benefit when shooting in difficult environments with poor footing and/or dim lighting, or when using the tilt LCD.

The fly-by-wire focus system is a love or hate feature and I seldom use it.

The lens looks very plain and unadorned, but all the quality lurks within. Nothing gets in the way of using the FE55, which also takes small, cheap and standard 49mm filters and comes with a easy fit reversible lens hood that can be a little sticky to mount in the stored position.

A lot has been said about the problems of hand-holding the a7r and its ‘shutter shake’. My experience is that – with care – the time-honoured formula of using a shutter speed of the reciprocal of the focal length, say 1/60 second for the FE55, is not far off the mark except for critical shots intended to be printed very large. I aim for 1/125 to 1/160 where possible as a hedge, as most of my subjects are difficult to revisit. A smooth slower shutter release is key in using the a7r handheld. Remember, slow is smooth, smooth is fast.

Drirung - ISO 100, f2.8, 1/3200s - (c) Philiip Partidge

Drirung – ISO 100, f2.8, 1/3200s – (c) Philiip Partidge

Sakya - ISO 100, f2, 1/3200s - (c) Philip Partridge

Sakya – ISO 100, f2, 1/3200s – (c) Philip Partridge

Conclusion

The FE55 is highly recommended.

It is an optical tour de force for many kinds of photography, and is almost certainly the most versatile normal lens ever produced in the format. It is compact and at 282 grams very light. Dust storms are frequent in Tibet but my copy of the FE55 is like new.

I think of the FE55′s qualities as multi-dimensional: performance is excellent from f2 to f11, resolution and microcontrast are excellent from the image centre to the very corners, and objects in image space are finely shaped with pleasing focus fade and bokeh, giving a splendid three dimensionality to images along with good separation.

This 55mm lens is reason enough to get into the FE system, as it offers a ‘back to the future’ kit lens option to the a7/a7r cameras for a reasonable outlay, considering the image quality they provide.

It is likely to remain a niche lens for some time to come – as it only fits Sony’s FE/E cameras, which the broader market is still coming to terms with. So to see what it can do for your work you will have to come over to the dark side, like the creature that left tracks in the snowy river image.

Samding - ISO 6400, f1.8, 1/8s - (c) Philip Partridge

Samding – ISO 6400, f1.8, 1/8s – (c) Philip Partridge

Philip James Partridge


Posted on DearSusan by pascaljappy.


#239. Zeiss FE 55mm Review. How Photographing La Defense Gave Me Second Thoughts!

$
0
0

A Sony – Zeiss FE 55mm review is a very easy piece to write. The lens is so flawless, there’s very little to say. It’s one of the sharpest pieces of photographic glass ever designed and who doesn’t dig the reassuring comfort of perfection ? In the image below, the original file resolves the individual steps in the staircases of the cranes. If there were operators in the cabins, you might be able to recognize them.


Glass buildings reflecting in the evening light in La Défense, Paris. Zeiss FE 55mm & Sony A7r. Zeiss fe 55mm review

Evening reflections at La Defense (Paris)


Why is it, then, that the photographs from official reviewers left me so unmoved? Why did I fall in love with the FE 35mm f/2.8 ZA and not find any sympathy for the bigger brother?


A portrait of a photographer using the Sony / Zeiss FE 55mm f/1.8 lens in La Defense, Paris. Zeiss fe 55mm review

The rightful owner (a.k.a. Philippe)


The fact is that many commented that pictures made using this lens during Sony’s official launch in Memphis were lifeless, particularly compared to lenses such as Zeiss’s C-Sonnar 50. Colour seemed weak. Drawing, clinical and harsh.

To me, it might have been an engineering triumph but had no place in an artist’s bag.

I could not have been more wrong !


The GDF - Suez tower in La Défense, Paris, photographed with the Zeiss FE 55mm 1.8 on the Sony A7r

Tour GDF – Suez in La Défense, Paris (click for full-size jpeg)


The image above is a tribute to the FE 55/1.8 ZA’s test lab abilities. You can click to download a (large) full size photograph. Strong added grain and heavy jpeg compression have harmed the sharpness significantly but the lack of distortion (around 0.2%) and low vignetting (less that 0.5 stops in the corner at this f/8 aperture, around 1.5 wide open) are plainly obvious.

The image below reveals almost total absence of chromatic aberration. This is spectacularly good. It’s the first time I have used a lens that good in this respect. Bright/dark edges are almost perfectly clean which contributes to this impression of high acutance.

Veiling glare is also a notable absentee and flare is non-existent with the sun in the frame. Like the FE 35/2.8 ZA brother, some situations with a very bright highlight just at the edge of the frame will send an unsightly plume scuttering through the photo (see the FE 35/2.8 ZA review here). I didn’t try making pointy sunstars so have no idea whether the “spotty sensor flaw is present or not”. If a reader has tried this, I’d be happy to hear about the results.


The tent structure in the huge arch at La Défense in Paris. Sony A7r and Zeiss FE 55/1.8 ZA (lens review).

Arche de La Défense, Paris. Zeiss FE 55mm & Sony A7r.


Is the Zeiss FE 55mm f/1.8 ZA an Artist’s Lens ?

I’m revisiting this lens because Philip Partridge recently sent me 2 of his superb Tibetan portraits. One made with the Zeiss FE 55mm f/1.8 ZA and the other with a Leica Summicron-R 50/2. Light conditions were different, rendering comparisons impossible. But the Zeiss had produced the more subtle, more elegant photograph! That was an eye opener.


Shadows and silouhettes of workers in La Défense, Paris, heading into the evening sun. Sony A7r & Zeiss FE 55mm f/1.8 ZA.

Gangs of Paris, Sony A7r & Zeiss FE 55/1.8 ZA


Time to pull out the photographs made with co-author Philippe‘s lens and gallant company one sunny spring evening in La Défense, Paris’s financial heart.

Time to assess the creative potential of the lab rat !

And what a tool ! (the lens, not me).

This thing clings to highlight detail like a limpet in a Hebridean storm. The micro-contrast at both ends of the range is so good, there’s unlimited fun to be had in backlighting situations.

If you want to create an Edward Hopper look in your photographs, look no further. It will also get you closer to that ethereal modern Medium Format aesthetics than anything else I know in the same price range.


Two co workers stand alone in the strong evening light at La Défense, Paris. Sony A7r & Zeiss FE 55/1.8 ZA

La Défense Nighthawks – Sony A7r & Zeiss FE 55mm f/1.8 ZA (click for larger version).


That lens showed me there’s creative life beyond the gooey comfort of Mandler Glow and that it was time for this old fart to learn new tricks (notice I didn’t mention bokeh …?*). It’s nice to see a lens having such a strong impact on the look of your files. It’s certainly not for everyone and C-Sonnar worshippers might not be impressed but many others will find a new source of inspiration.

I want one and hope Sony incorporate some of its DNA in whatever they will be releasing at Photokina (RX-2, fixed-lens medium format …) to make us poorer.

(*) Bokeh is good, with no unnatural oddities and faint onion rings in defocused highlights.


Zeiss FE 55mm Review Conclusion: is it suitable for Travel Photography?

As Philip Partridge has aptly demonstrated here (Tibetan review) and here (Landscapes of Ladakh), this is a 5 thumbs-up lens for reportage and travel photography. Compact, light-weight and nice to handle it is also an excellent performer in most situations.

Some landscape photographers will probably prefer more traditional lenses and this Sonnar 55/1.8 is not the ideal choice if you are trying to recreate the look of Cartier Bresson. You also need to take care with high contrast scenes, unless including pure black and/or pure white in your frame is by design (shock, horror for the Grad ND / Polarizer / Warm Up school of thought ;) )


Provence Sunrise, with the Leica-R look

Provence Sunrise, the old fashion way


But I cannot imagine a more rejuvenating lens for fashion, street, architecture or travel photography. It is also wonderful at picking out detail in twilight, where lesser alternatives would retrieve nothing but mud pudding. Sony really have hit a home run with their first two A7/A7r lenses.


Posted on DearSusan by pascaljappy.

#251 Showdown: LightRoom Vs Capture One

$
0
0

Ever heard of David and Goliath? Well, that is about how things stand between the Goliath -nay the inventor- of photographic post-processing-, the ubiquitous Adobe, and small -but maybe nice, who knows?- Danish Capture One.

For a few years I have been a user of LightRoom, Adobe’s middling software. More powerful than Photoshop Elements, and sporting a useful catalogue feature, but a lot less potent than behemoth Photoshop. I am well used to LightRoom, and wasn’t especially unhappy with it until Adobe struck. They decided that all further upgrades to Photoshop would be on the Web-based, rental-version-only Creative Cloud. Clearly, not everyone loved the idea of having to pay a monthly fee instead of deciding if and when they might upgrade and own the software outright. They liked it even less when it transpired that, should you cease to pay the CC fee for whatever reason, you would lose access to your pictures, which became Adobe property. Now, it seems, Adobe will let you opt out of CC without seizing your pics, but in doing so, you lose all your edits and all your tools. Now some people claim to love this approach, but I did not, and still don’t. I decided it was time for me to look for alternatives. As I write this, I am not totally sure how matters progress, as it seems Adobe will, in fact, issue an upgrade to Photoshop. Still, the idea of losing access to my pics and/or edits is a powerful motivator even if Adobe hasn’t yet replicated its Photoshop policy with LightRoom, and claim to have no plans to do so.

There are essentially 2 alternatives: DxO and Capture One (and others as well, but not so widespread, and also the dedicated Canon, Nikon and Sony software). There also is Aperture software for and by Apple, who have just now announced that there would be no further development, so Aperture users may feel it is time to jump on another bandwagon. I had read many reports that the Capture One RAW converter was the best of the bunch, so I decided to try that one first.

1. Basics.

- Starting up with Capture One requires investing some time. The interface is not the same as Adobe’s, and it took me a few tens of hours before I got reasonably comfortable. Now, 3 months into the process, I am still learning quite a bit thanks to the excellent C1 tools (see later), and have yet to achieve the level of fluency 5 years of LightRoom brought me. But, as to finding out whether Capture “is your thing”, the 60-day free trial should be more than enough, as was the case for me.

- Capture One is more powerful than LightRoom in terms of post-processing, even if only because it will let you do local area adjustment layers and masks , a powerful feature Adobe only includes with Photoshop.

- There may be differences between RAW processors, but they are dwarfed by the differences the software generates at the post-processing level, simply because each one is a different tool, and, as such, induces the user towards different results. Thinking twice before spending 200€ for different software that could make all your pics better just sounds stupid when you think of the cost of any piece of gear.

- Capture One has a vastly better trove of learning and support tools, all of them free. Webinars, newsletters, online videos. Wow! By comparison, Adobe only offers a FAQ-type online help. No comparison! C1 could be better yet, though: their search engine for technical tips is not the best, and sometimes points you to pages that don’t exist.

- Price: LightRoom is a bit cheaper. I paid 90€ for mine, an upgrade to LR 5 from LR 4, and 120€ for Capture One version 7, using a promotional period. Hardly a deal-breaker, but a + for Adobe, if only of trivial importance.

- Migration: Capture One claims that they can migrate a LightRoom catalog into a C1. I haven’t tried it yet, but neither have I found evidence that this a fake claim

- Robustness: no doubt about it, LightRoom is very robust. Features work as advertised, they dont just “hang” the system, and neither do they crash it. So far, I would say that Capture One is robust, but not quite as much as LightRoom. I have had just a few minor hangups when trying to load pics from my camera. But no crash, or lost files (of course!). Not a deal-breaker IMHO unless you happen to be the really worrying kind, but that round goes to Adobe

-Speed: now I am not a PP expert or fanatic. I like to get, as much as I can, my pictures right from the start. Call me old-fashioned. So I don’t like to spend hours in front of my computer, agonizing tens of minutes to make one picture absolutely perfect. And, to some extent, neither do I enjoy beautifying a shot with software to the extent that the picture is better than reality is or was. With that in mind, I find the two essentially equivalent. With a bit of practice, I can process a standard shot (using no batch processing) in just about the same time, around 30 sec. and decide whether it is “worth” more care, or not. So I call this a draw

2. Features

- Sharpness. This round goes to Capture One big time. There is a slider called “structure” which, combined with some sharpness, gives me better results than I ever could get out of LightRoom. If you are a sharpness fiend, Capture One is for you.

- Noise suppression. Again, this round goes to C1. Better, more flexible noise suppression. If you are into noisy shots (I am not, I take care of those with a tripod and long exposures whenever I can), try C1. Though I suspect that LightRoom is actually a bit better at RAW conversion of seriously underexposed shots, so it may actually require a bit less noise suppression.

- Colours. This is a highly individual choice. I like C1 colours better. More saturated straight out of conversion, more sparkle. But that’s just me. And the combination of the colour adjustment tool and local area adjustment is just so cool…

- Dynamic range. Another round for Capture One. It has a great tool by which you can stretch the DR of a shot in a second, to great effect. LightRoom lets you do it too, but it is far from as nice and easy.

- User interface. Call it a draw. The LightRoom UI is more intuitive, simpler (and I have been used to it for years), but the C1 UI lets you do things that I would have LOVED to be able to do with LightRoom. It has an “undo” feature for your last stroke(s), as well as one on most major tools. This alone could be worth buying into C1 for those of us who love to try out stuff. But a simple and effective UI is no less desirable, so a draw it is, as I see it.

- Catalogue. This round goes to LightRoom. While this function exists in Capture One as well, it is simply better in LR, which was originally designed around it, and Capture One not.

3. Sum-up

I could of course, go on and on. There are many more features and benefits that are worthy of discussion, but, ultimately, it comes down to a binary decision. One or the other, as it would be overkill to have 2 processors and 2 catalogues of pictures, unless you are a lot more devoted to PP (Post Processing) than I am. So, how do I view things? Capture One is, in my view and for my needs, better than LightRoom. Learning tools are much, much better (I just got an e-mail that reminded me that I have a free Webinar on colour control for which I am signed up coming up tomorrow). That I can do layers and masks is probably the single largest difference, bringing it closer to PhotoShop. When it lets users process multiple shots, such as panos or HDR, which a major feature I would love to see, it will be a total no-brainer. Until then, it is my software of choice, and I encourage people to try it out.

4. Pictures

The first batch of pics is the one that matters most IMHO. I picked them from my Iceland trip with Boris, already posted on DearSusan. Without looking back at what I’d done then, I reprocessed a few from scratch on Capture One. So they are not identical, nor did I strive for them to be. I just went where the software lead me. The first pair is LightRoom, and the second Capture One

DSC09868 DSC09872

30 31

As you have guessed, shots 1 and 4 are the same, but look very different.And, to be honest, becuse I didn’t look back at the shots I’d processed and posted 3 months ago, I am shocked. Capture One gets a lot more colour out of the shot, and that without help from the saturation slider. Part of the difference comes from the white balance tool. The A7R and Olympus combo gave me very blue shots, which needed correcting. The C1 tool just did a much better job of getting the foamy water back to white . And when I turned the exposure down, up came to glorious orange of the rising sun. Not so on LR, where I had to battle to get rid of the blue and settle for a much more “misty”, or “hazy” atmosphere. At this stage, to me as a non-expert, it does feel like Capture One’s highlight recovery is significantly better than LightRoom’s. The same which the swirling water, where LR gives a much smoother result, and C1, with the help of the “structure” slider shows more turmoil. 2 & 3 are not the same, but show that there is indeed a “group look” to what I chose to do with either processor. As they say “horses for courses”, choose the one that suits you.

The second batch is made up of pictures I took with my Canon camera (5DII and III), and processed originally in DPP, Canon’s proprietary software. In order to keep the test as bias-free as possible, I will now reprocess the shots fresh into LR and C1. This way, my “ability”, “mood”, my “taste”, and whatever else might have influenced the outcome of comparison n°1 will be eliminated.

IMG_0187 IMG_0127

35 33

Now this is the first time that I process shots at the same time in LR and C1. The differences are striking. For example, on LR, the clouds are not burned out. On C1, I need to turn exposure down by 1.6 stops to eliminate any burnout.  The results are very much more comparable than on the previous batch. What does this mean? That the Sony preset on C1 is much better than LR’s, whereas this is not the case with the Canon preset.

We can check that with a third comparison. Simply RAW pictures unprocessed, so that the result shows only 2 things: the quality of the RAW processing engine, and the default presets for both. As always, LR first, then C1.

IMG_0202

36

Now there is no doubt in my mind which one is more to my taste. While the difference is not as great as in the first batch, the colours in the mid-tones are better, and in particular the differentiation in colours is greater in C1. Oh, did I forget? This is with a Canon picture. Now let’s try a Sony unprocessed RAW. And, just to be as favorable as possible to LR, let’s choose one where there are no issues with highlight  recovery. Oh, and just because I am such a tease, instead of an A7R picture, I selected one with a NEX 7, well known at this time, so that any preset Adobe or Phase one have in place has already been fine-tuned.


_DSC9628


37

Ok, now we know what is due to the RAW processing engine itself, and what is due to the processing possibilities. Remember, I am not a processing champ, far from it. Regular Joe is more like it. So I am not saying, coming back to the first and startling example, that LR “can’t do it”, only that, given both pieces of software, my limited ability, and my limited appetite for tens of hours of learning all the bells and whistles, this is what I get.

Last batch. Another Sony A7R shot, like the first pair, also processed in both LR and C1, but, this time, at the same time. And again a different type of subject.

DSC00683-2

38

5. Conclusion

So there it is. There is not one face-off where I prefer the LightRoom images. And in at least one case, it suffers a catastrophic loss. It also fails to win on features, and hugely on support, not counting the threat to Adobe users of being railroaded into a cloud-rental only program. Do you understand why I jumped ship?


Posted on DearSusan by philberphoto.

#283. Zeiss Loxia 50mm f/2.0 first review

$
0
0

DearSusan readers are in for a treat: this is, to my knowledge, the first published review of the Zeiss Loxia 50mm f:2.0.

Now, before I begin, I have a confession to make. I am a sucker for 50mm lenses. I remember walking away from my long-time favorite Zeiss 50mm ZE Planar f:1.4 with a guilt feeling, like I’d left my loyal dog behind at the Animal Pet Rescue shelter. While that lens had weaknesses, it just felt so “right”, both in terms of physical package and in terms of focal length that I used it almost without thinking. I would go out with just this lens mounted on my Canon 5DII and never feel like I was missing something. Until now, I could not find its successor on my Sony A7R.

No point in beating about the bush. I have found it it! The Loxia 50 is everything I hoped for in this respect. I am officially in love!

A study in green using the new zeiss loxia 50mm f/2 lens with the Sony A7r camera

144

1. The physical package

First the good news. The Loxia is (for me), just the right compromise in size and weight to balance perfectly on the A7. It is close to the length of the Sony-Zeiss FE 55 f:1.8, but, because its diameter is smaller, it looks and feels more compact. Second good news: a triumph of German engineering and Japanese precision manufacturing means that the lens cap actually stays on the lens when it is meant to, unlike previous Zeiss designs.

Two weaknesses though. One is that the lens cap (included in the price, unlike what was circulated at the time of the launch), is finicky. And when it is resting on the lens barrel, meaning not in use, it obscures the focusing ring, meaning one can’t use the lens…:-( The other one is that the aperture ring is thin, and located very close to the camera body, making it a bit tricky, especially for people with big hands and fat fingers.

Otherwise, the lens is very pleasant indeed to use. The all-metal construction feels very solid, the focusing ring is smooth, the aperture ring, with 1/3-click increments, works fine, and the focusing throw is, in my opinion, just perfect. That makes it a very easy lens to focus. It is also a rarity in that it is, so to speak, semi-electronic. Its operation is manual, but it does have electronic contacts, so it gives out EXIF data, a plus in my book, and when focusing, it moves straight to magnification, another plus.

So, overall, a very good package indeed. I would grade it a significantly classier than the Sony-Zeiss FE55, itself a premium lens, one small notch above the Touit, another great range of Zeiss lenses, but maybe just a small notch less than the Zeiss ZM, that have, in my opinion, a look and feel which is even a bit more refined. On the subject of look, the Loxia have a purple-blue-fuschia ring resting on the camera mount, the same colour as the background of the Zeiss logo. That ring, when the lens is mounted, offers a strange and unpleasant clash of colours with the copper ring on the Sony mount. Details, details…

A couple of examples wide open. On the scooter shot, focus is on the speedometer

A study in red : zeiss loxia 50mm f/2 lens & Sony A7r A study in blue : new zeiss loxia 50mm f/2 lens on the Sony A7r


2. Performance

The Loxia is largely based on the Zeiss ZM 50 Planar f:2.0, an older (developped in film times) but very well liked lens. It is noted for beautiful colours, sharpness, and great transparency.

The basic design itself, the Planar construction, or double-Gauss, is noted for its simplicity (light, not over-expensive, letting lots of information through, but not totally perfectly corrected). Those familiar with the ZM 50 Planar will be neither surprised nor disappointed by the Loxia. It is not a spectacular lens, like a Makro when it comes to detail, or the FE55 when it comes to sharpness, but it just does everything so well. Colours are first rate. Detail is excellent, including at infinity. Sharpness is excellent.

Basically, it just disappeers, in that it never calls attention to itself. Rather than eliciting a “Whew, what a lens!”, it generates a “Nice shot!” comment. That, to me, is high praise indeed. Others may thing otherwise.

It does have some weaknesses, though. I noted 2, with one question mark. One is more CA (colour aberration, the purple fringing type) than I would like. Of course it is easy to remove in PP, and cleans up well, but we’d all rather it weren’t there.

The other one answers the dreaded question: how well does it mate to the demanding A7R? The answer is that, at infinity and wide open (the most demanding condition), the corners aren’t totally sharp, and you get a hint of mush. Now what lens is really perfect under these conditions, short of the Otus, especially with a 36Mp camera? And how often does one shoot wide open at infinity? But we’d also prefer if this weren’t the case, wouldn’t we?

Whereas the Loxia has some areas in which it really shines (its “3D” rendering is first-class, as befits a Zeiss lens, and is much better than the FE55 in this respect), its colours are smashing, it also has a couple which without being weaknesses are not strengths either.

  • Bokeh is typical of double-Gauss in that it is not the smoothest. Not objectionable, but just a bit nervous with lights in the OOF background.
  • And flare resistance is also not necessarily as high as I would have wanted.

Its sweet spot is between f:2.8 and f:4.0. Wide open, sharpness drop-off is not that severe, not more than the FE55, which is well respected in this area. Performance improves at f:2.8, a bit more by f:3.2, and just a shade more by f:4.0. At f:5.6 it tends to get just a bit less warm and a bit more clinical. That is fine for a 50mm lens, often used at short-to-medium range and fairly open.

Here are two shots to show bokeh, both in front and behind. One shot is focused ont he closest right-hand seat, the other on the third-row one.

Café tables with the new zeiss loxia 50mm f/2 lens on the Sony A7r.Bokeh study 1 Cafe tables with the new zeiss loxia 50mm f/2 lens on the Sony A7r, bokeh study 2

3. Summary

From a classic construction, and a classic predecessor, the ZM 50 Planar, Zeiss have released what will undoubtedly in my mind become a mainstay for A7 owners who are into MF.

A good physical package, easy to use, with a classy feel, delivering superb IQ at a price which, while premium, is not a luxury. Zeiss have done it again! If I had to find a lens to which it relates, it would have to be the Leica 75mm M APO Summicron. It also has a way of “getting out of the way”. Slightly sharper than the Zeiss, but with less punchy colours, and a more clinical rendering. Calling the Loxia a “mini-APO Summicron” is in my view a big compliment, particularly in view of the price difference, and one which will IMHO annoy both Leica and Zeiss.

Now, if only we could have more Loxia announced, included a much awaited wide angle. My money is that we will get a Loxia version of the great ZM 18mm Distagon f:4.0. Boy that would/will be some lens! Until then, my 50 will be my go-to take-anywhere shoot-anything lens, and my FE55 needs a new home.

One shot wide open with distant background, and another that shows close up performance

zeiss loxia 50mm f/2 lens on the Sony A7r photograph of a statue near Paris, France A study in yellow flowers photographed with the new zeiss loxia 50mm f/2 lens on the Sony A7r

Finally, here is to my new Baby, the Loxia 50!

A statue photographed with the new zeiss loxia 50mm f/2 lens on the Sony A7r


Posted on DearSusan by philberphoto.

#285. Zeiss Loxia 50/2, Sony FE55/1.8 and Leica Summicron 50/2, the Great Normal Lens Shootout

$
0
0

So there we are, admiring the city of Paris from above on a cold and wet wet wet autumn morning to give the Zeiss Loxia 50mm f/2 a second look (Philippe’s world first public review is here) and compare it to its natural rivals : the Sony / Zeiss FE 55mm f/1.8 Sonnar T* and the Leica Summicron 50mm f/2 (in its latest design). I reviewed the former here and declared my love for the Summicron on multiple occasions, most notably here.


DSC06877


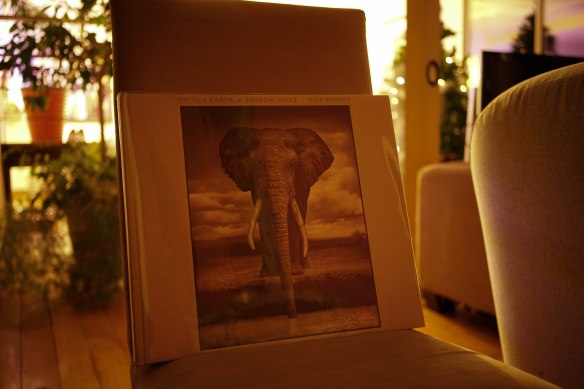
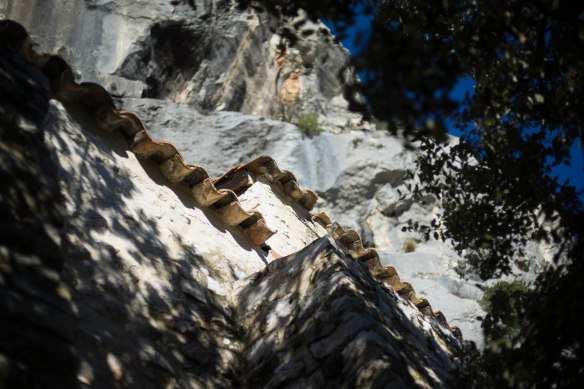
We’re up at sparrow to catch the rising sun shine its glory on the alabaster-white walls of the Sacré-Coeur Basilica in Montmartre and infuse its golden goodness into the glass towers, medieval streets, leafy parks and river bends that make this proud capital one of the most desirable places to photograph on the globe.

And, as you can tell from this first image, it ain’t really happening.

But worry not. Over the course of an exhausting, 12 miles and 300 frames day putting the final touches to the upcoming InSight: Paris guide, we face a wide variety of weather / lighting conditions ranging from belting rain to glorious sunlight to open shadow.

OK, this is a long review. Onwards!


Build & Ergonomics

There’s little point in rephrasing Philippe’s original words. Let me just say that the auto-zooming as you rotate the focus ring combined with focus peaking make this the easiest lens to focus I have ever used. On static or slow-moving targets, I find this far preferable to any AF available today.

The Zeiss-blue bottom ring adjacent to the A7r’s orange mount makes a strong case for colour-blindness.

Build is classy and modern, the focus ring is positive and well damped with absolutely zero play or backlash.


DSC06939


Though Zeiss make no claims for water-resistance, the lens’s first day in my keep was veeeery rainy and it seemed to fare much better under the conditions than the poor A7r, whose rear screen activation was the first to go awol (ditto on Philippe’s A7r), soon followed by the selector wheel and worrying battery drainage.

In a 3 way battle with it’s previously mentioned competitors, the Loxia 50 ranks second for sunshade design, behind the sheer retractable brilliance of the Summicron 50 but neatly ahead of the FE’s more cumbersome and less sexy design.

And I’d stick to this order of merit in terms of build and feel.

But the focusing yumminess of the Loxia, it’s adapter-free nature and Exif data make it the global winner for me. An aperture ring in 1/3 stops is also smile-inducing.

The Loxia 50 wins this round.


Colour

We were all led to believe Steve McCurry is a genius, but the reality is he simply had a Loxia before the others ;)

Unless otherwise noted, all the pictures on this page are straight out of camera except for auto white balance in LightRoom (in camera AWB is a joke on the A7r). And, as you can see, colours are bold yet realistic.

DSC06893

DSC06980

DSC06926


Even in a scene where natural colours are less berzonkers and more subdued, the Loxia 50/2 transfers hues cleanly and truthfully.


DSC06974

DSC06972


A telling sign of how well this lens performs is that I have not yet resorted to my usual “willful” post processing. I will, obviously, because that’s the look that appeals to me. But I have been so amazed by the out-of-the-box colours of my 300+ images so far that I’ve just corrected white balance to let colours sing naturally.


Skin tones

After Philippe’s world-first review was published we were asked to evaluate how well the Loxia deals with skin tones.

Sadly for us all, the foul weather conditions meant that tourists of all climes were indeed present but few were showing any skin at all. However, let it not be said DearSusan gives up easily. We rang a model agency (or maybe, we were just lucky …) and soon had 4 pretty ladies walking up and down the Ponts des Arts.

DSC07050


What do you think ? Below is a photo of hair, which is just as important as skin rendition for portraits. Click for a full-size file showing tremendous detail and lifelike rendering.


DSC07054

DSC07043

DSC07070


As before, the first word that comes to my mind is natural. Colours are strong (see green bottle and red label above) but also very realistic (the rest of the scene above, and the scene below, with the sun finally out).


DSC07073


To use the adequate ISO9001 colour measurement terminology, I’d rank the Loxia 50/2’s colour rendition as : bloody marvelous. Reds, blues, greens, faded colours, strong colours, you name it. The separation between close hues is clean and full of subtlety. And the lens shows great transparency and clarity. This could be expected of the lens’s design, and also of the reviews of its ancestor, the Zeiss ZM Planar 50/2.

Another strong point is the absence of colour shift as you change the aperture. As you can read in my Leica Summicron-R 50 review, even the best lenses can be afflicted by this. But I didn’t notice the problem at any point with the Loxia 50/2.

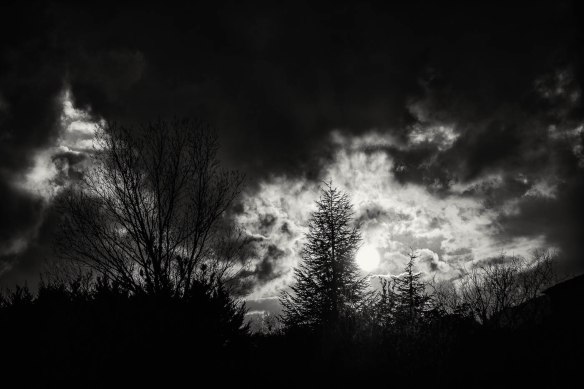
Micro contrast is not very high, though, so rendition appears smooth and transparent but natural and never aggressive. As you can see below, this translates well into B&W.


DSC07051-Modifier

DSC07055

DSC07055-Modifier

DSC07090-Modifier

DSC07093-Modifier


All in all, I think the general aesthetics of this lens are slightly out-of-time. Something in the way it draws is classic, but the absence of vignetting, great purity and transparency feel very modern. It’s a great lens for reportage or traveling, transmitting exotic photons with a neutrality that is welcome when there is no chance to retake a picture.

So, the Loxia 50/2’s handling of colour and tone shines in isolation, but you can see how it fares compared to 2 adversaries mentioned in the title, below. Differences are subtle, but they are there.


In the field, showdown time

“All very well”, you murmur, “but how it stacks up against the competition is what we want to know”

My thanks go to Philippe, who is selling his FE 55 (leave a comment to grab it now, I’ll keep it private), for holding on to it long enough for this side-by-side comparison to take place.

We set up our tripods on the lovely Pont des Arts for aperture series close up and at infinity. Boredom alert …


Close up comparison

Zeiss Loxia 50 Zeiss/Sony FE55
f/2 f/2 f/8
f/4 f/4 f/8
f/8 f/8 f/8
f/16 f/8


The main difference I’m seeing at f/2 is seemingly identical detail in both lenses, but higher accuance in the FE55. And a hint of veil in the out of focus zones on the Loxia 50/2.

At f/4, my verdict would be reversed, with a tiny advantage to the Loxa 50/2 over the FE55.

At f/8, I think the Loxia maintains or increases its advantage.

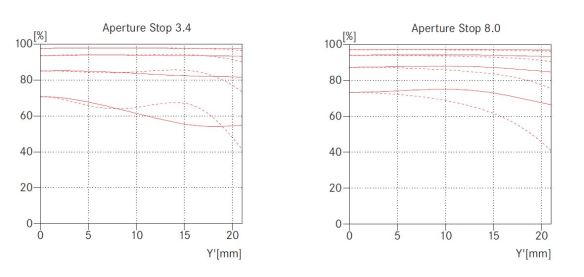
In terms of sharpness, there’s actually very little in it. Given that the FE55’s MTF curves rank among the best the human race has ever created and the Loxia’s border on the oh-hum at all apertures in comparison, it’s probably fair to say that Sony hires separate designers for the lenses and their brochures ;) At any rate, the Loxia holds its ground well in this, lofty, baby OTUS company (please note that, at the moment of writing, Lightroom has no profile for the Loxia. We may see even better result from the lens in the near future).


Infinity comparison

Zeiss Loxia 50 Zeiss/Sony FE55 Summicron-R 50
f/2 f/2 f/8 f/8
f/4 f/4 f/8 f/8
f/8 f/8 f/8 f/8


Again, there’s so little in it that most differences are hidden in the ugly jpeg compression (files look a lot nicer at 100% in LightRoom). But forced to make a choice, I would say the following :

At f/2, my winner is the Summicron in the center, then the Loxia (very marginally), then the FE55. In the right edge (buildings on the right of the bridge), the same order applies, with a greater edge for the Summicron, in spite of an obvious veil. The cleanest, and best, image probably comes from the Loxia.

At f/4, I’ll put the FE55 in front of the other 2, tied, in the center zone. On the right-edge buildings, the Summicron seems to have the most detail, followed by the FE55, then the Loxia 55. But the Loxia 50 and the FE55 give the cleaner image. The FE55 wins this one.

At f/8, detail level seems identical, but the Loxia and FE55 give the most pleasing image.

My conclusion is that sharpness is really not what you should go by to separate these lenses as all 3 perform on a very similar level. Ergonomics, AF and rendering are much more important here.

Strangely enough, it appears the A7r exposes much better with the Loxia than with the others, particularly the Summicron, with which underexposure seems to be a given (Summicron 50 frames were given a +0.4 exposure boost here and still look underexposed). Based on these examples, I’d have a hard time choosing between the Zeiss Loxia 50 and Zeiss/Sony FE55.


Focus : shift, breathing and plane

The following day, looking for focusing oddities, I took pictures of a straight lines on the streets by the port of Marseilles and found no trace of curved focus “plane” or of focus shift. Both are good news, and the latter particularly welcome in a manual focus lens.  To confirm this informally, I focused (using focus peaking) on a range of targets and checked that focus peaking stayed in place while I changed the aperture. It did.

On the other hand, the Loxia 50/2 seems to exhibit some focus breathing. Not being a videographer, I’ve no idea how severe that is compared to other lenses, but download the two images below and switch rapidly from one to the other and you’ll see that focal length appears longer at close focus than at longer distances.


DSC07180

DSC07181


Flare, no glare

As previously described by Philippe, the lens can be made to flare.

So far, I’ve never found flare to to be an inconvenience, but the photographs below are proof of its existence. Nothing overly objectionable in most situations, but flare actually becomes more visible (concentrated in a smaller area) at small apertures. First image at f/5.6, second at f/2. Caveat photor.


DSC07134

DSC07135


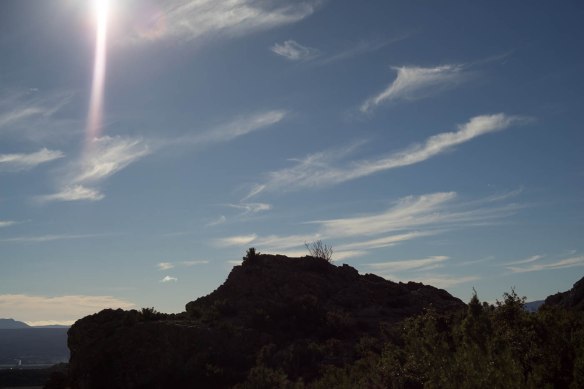
Glare, on the other hand is almost totally absent. The photograph below demonstrates the very high global contrast that can be dealt with. This is at f/4, the aperture which I consider the best balance between technical excellence and “organic” drawing (more below, on this). Click the image for a full-size image and see how sharp and clean the lens is at this aperture.


DSC07142


Bokeh & that Zeiss 3D pop

Far from being a bokeh-king, the Loxia 50/2 uses out of focus areas more to articulate planes in a very natural fashion rather than to bathe us in creamy custard. In most situations encountered so far, it’s pretty classy and elegant. I lack the patience and lab-rat inclination to run more aperture series for bokeh, but here are a few examples at various apertures. UPDATE: I was asked for Bokeh samples at f/2.2 to f/2.8 in various scenarios. You can find them here Loxia 50/2. Bokeh Series.

In distinct near-far relationships, the 3D rendering is really very good (next 5 images at f/2).


DSC07129

DSC07122

DSC07214

DSC07158

DSC07159


You can click the final image for a full-size image that will give you an indication of far-edge sharpness at close range, f/2 in a dark area (focus is on the eye at the bottom). Not bad!

In more “continuous depth” settings, the progressive change from sharp to unsharp also contributes to the sensation of 3D (below, f/5.6).


DSC07085


But when the background has strong texture, the lens is obviously not at its best and gives us agitated bokeh. This is evident, for instance, in the photo of the gentleman facing Marseilles, at the top of this section (click to enlarge), where out of focus buildings are slightly “gritty” rather than perfectly smooth. Also in the stained glass of the last-but-one photo below.

Specular highlights do not attract undue attention to themselves.  And I see none of the swirling nasties associated with some (relatively) ancient designs.

All in all, this lens is all about subtle 3D cues and natural looks. The 10 blade diaphragm keeps the aperture almost perfectly circular at all settings and is probably no stranger to the pleasing results.


Chromatic aberration

The Loxia 50 is not an APO lens and chromatic aberration can appear on high contrast edges. It’s a little more than expected, but rarely bothersome in real life and usually very easy to correct in post-processing.

Click the image below to zoom into the offending zone for a real life example at f/2.
DSC07004

Minor traces of Longitudinal CA (I think) can be found in several of my photographs. It becomes evident on some out-of-focus highlights that are not bright enough to blow the flaw to pure white. In the photograph below, the effect is also quite evident as you follow the string of rivets from below the Airstream4u sight to the left. As rivets become more and more out of focus, they become colourful onion rings rather than blurred rivets. It’s obvious at full-size, invisible at web-size, does not bother me at all and shouldn’t bother many others either.


DSC07177


What’s not to like ?

Not much, actually.

Corner performance is not that brilliant at wide apertures. The lens sings from f/2.8 to f/5.6, after which it seems to trade a little bit of it elegance for a more clinical character (see below, click for full-size picture).


DSC07208-2


My greatest worry is this : performance is just fine for an A7r. But, as mentioned in my preview, how well it will fare on 50 Mpix sensors of the likely near-future is not so certain. So is this lens future proof? Most of my shots of the day were made at f/2. If that aperture became a low-light convenience setting rather than an artistic choice, the lens would lose 50% of its appeal to me.

Philippe reported a tendency for flare and a little chromatic aberration, which I can see as well, but is a very minor issue.

The sunshade is a tad finicky to set up at first, so leave it on permanently if you can spare the room in your bag. And the front cover doesn’t fall off anymore, depriving me of the pleasure of ranting about it.

That’s about it.


DSC07127


Just to nitpick, I might voice a tiny complaint against the placid nature of the lens. Comparing my photos with Paul Perton’s at the end of the Paris day, I did miss some of the strong drawing character and bold colouring of his early Leica jewels. Neutrality is good in politics, but art needs a drop of hooliganism here and there. If I owned a Porsche Cayman (the uber-poised, unflappable mid-engine treat from Stutgart that the Loxia evokes in my mind), I’d probably occasionally paw through the Jaguar catalog with envious looks at the F-Type bad boy.
I’m just sayin’ …


In clonclusion

So, there you have it. The thorough examination of this new lens that was needed for me to replace my beloved Summicron-R 50/2.  It’s no hard for me to admit I wasn’t expecting it to be this good and considered it to be a half-ass effort by Zeiss to cash in on an old design, much like the 7 re-editions of Star-Wars, for instance. The truth is Zeiss seem to have produced a gem. And I wish them well on the cashing-in.

This update of a 30 year-old design turns out to be an extremely well though out compromise between the conflicting criteria of redesign costs, size, price and performance.

Balance and natural class are the words that come to my mind to describe the result. Plus it looks damn good on the A7 and feels really nice in hand.

DSC07104

In car terms, the FE 55 would be the Nissan GTR, that seemingly soulless technological monster that beats the rest in pure performance terms and does so many things (highlight contrast, in particular) so well. The Loxia 50, as suggested above, would be the supremely competent Porsche Cayman, with it unshakable poise, balance and elegance. And the Summicron, well, I like to think of it as an e-type on steroids (Eagle, anyone ?) that can oversteer any sadness out of your soul with little regard for driving efficiency, yet perform rigorously (and oh-so beautifully), depending on your needs and mood. I did my best to rent an OTUS 55 to make the comparison complete, but it was not to be. No Nikon-mount OTUSes (OTI ?) can be rented in Paris, incredibly enough. And none of the DearSusan crew own Canon adapters or wish to do so ;) But I’m pretty sure the OTUS 55/1.4 would have been every bit the Bugatti Veyron. Sharper still, more contrasty and so flipping fat and expensive you’d never take it out of the studio.

There will always be a place in my heart for a tuned e-type. But it has to be said that for every day driving, the Cayman is my pick (he wishes!). My beloved Leica Summicron-R 50/2 and assorted Leica Elmarit-R 90/2.8, both on Nikon mount, are now both for sale. (leave a comment to grab either or both now, the comment will not be published).

The Loxia range is off to a great start : the 50/2 is definitely a keeper!


DSC06870


So, now, a thank you and a plea to Zeiss : the ZM range contained several gems (the 25/2.8 Biogon being my favourite) but the individual lenses displayed very different personalities. Since the Loxia range will allow us to share ergonomics, filter sizes and A7r compatibility, can you please, please, homogenize the rendering of the various future constituents to make this a consistent range? Please!


DSC06911

Bleu, Blanc, Rouge (c) Caroline Dache


Posted on DearSusan by pascaljappy.

#297. First footing with the Fuji – discovering the X100T

$
0
0

Placard, Cape Town

Placard, Cape Town

You’re a photographer, right? And you already know that packing for a trip is the easy bit. It’s the camera, the lenses and the bag to put it all in where the wheels usually come off – low mass or it’s the hassle with the check-in desk?


My much loved Sony NEX-7 is nearly three years old, its technology as much as two years older than that. The rubber grips have been falling off since I got it and I’ve bought countless tubes of contact adhesive in various spots around the globe to stick it back into place again. Every attempt has failed and the damned thing flaps irritatingly, right where my right thumb wants to be.


In it’s favour, it’s never let me down, nor have the manual lenses that I choose to use. If there’s been a photographic failing, it’s invariably me not doing something properly.


So, there I was; bags almost packed, the Sony and lenses marshalled and just a couple of sleeps to go before we head east. With an hour or two to spare, I wondered what might be a nice alternative, something that nailed focus accurately and delivered better low light shooting.


There’s lots of choice, but way too much middle ground. I looked at Panasonic’s LX100 (I don’t like the retreat to 4:3), Leica’s T, Sony’s A7, the newly refurbed Fuji X100, Olympus (still don’t get M43), Nikon and eventually ran out of stamina and gave up. We’re going to Tokyo, so maybe I’ll find what I want when I get there.


Parliament Street, Cape Town

Parliament Street, Cape Town


And then late on Monday this happened.


Ring, ring. Ring, ring.

“Hi. Is that Paul?”

“Yup.”

“This is Stephen from ORMS in Cape Town. I said I’d call you when we got the Fuji X100T in.”

“Got a black one?”

“Yes. Shall I put it to one side for you?”

“I’ll be there at lunch time.”


Monument to Louis Botha, outside Parliament, Cape Town

Monument to Louis Botha, outside Parliament, Cape Town


For just pennies more than I’d expect to pay BIC Camera in downtown Shinjuku, it’s now mine. With a spare battery.


That didn’t help, though.


Cape Town on a warm early summer’s day seemed like a great opportunity to get the X100 out of its box and do some get-to-know-you shooting. Liking what I was seeing, I got to Adderley Street (about 800m), before it started telling me the battery was almost done. Hah! That’s no problem, I’ve got a spare.


I do and it didn’t take long to discover that was even deader.


Just as well really. I hadn’t read the manual, didn’t have a clue why my clumsy, ill-accustomed fingers were pressing all the wrong buttons – time to head home. Late afternoon with fourteen RAW images from the streets, two charged batteries and the sun going down – producing a spectacular sunset that it seems only the Cape can deliver. The X100 was never bought for this purpose, but a little landscape shooting would perhaps take the edge off a craving to shoot something, anything.


Sunset - looking south towards Hangklip

Sunset – looking south towards Hangklip


The results of all this were pretty good. My usual software of choice is Aperture, which Apple euthanised a couple of months ago. It’s successor is only expected next year and while the company continues to update its excellent RAW converter, the X100 upgrade has yet to appear. That left Lightroom – to me, the photographic equivalent of a cold sore.


That said, ACR is up to date and it dealt with the X100s files from my all-too-short walk just fine. Apart from that, it was an out of the box experience and the results were pretty amazing for a first-off.


The sunset shots needed a bit more massaging, but the depth of information in the Fuji’s RAW files coped with that really well and I pronounce myself well pleased. Very.


Next time; waiting for the wind to stop.


Posted on DearSusan by paulperton.

#298. Waiting for the wind to stop

$
0
0

The Fuji’s frame counter now reads 109. This week’s wind – quite normal for the region at this time of year – has been hammering away making trying to do pretty much anything outside a bit of a challenge.


So, I’ve not had the practice with the X100 I’d hoped for – especially as it’s camera choice no.1 for the overseas trip that starts on Monday. What I have managed to shoot has however, produced several images worthy of posting on Flickr and 500px, but I’m about to run out of those.


During the hiatus, I’ve been working at my Lightroom skills and still don’t like it much. I have found out how to make SilverEFX Pro work and downloaded yet another of Adobe’s eagerly trumpeted and seemingly endless updates. The first is critical and the fact that it is unsupported will probably stop me migrating to Capture 1 rather than LR. The second is just a complete PITA.


I still haven’t found a decent uploader for either Flickr, or 500px, which continues to colour my judgement somewhat.


I had to go into Cape Town on Thursday (I live about 70km outside the city) to meet a friend. Beset with a post-NGA itch that calamine wouldn’t still, I left home a couple of hours early and walked the somewhat less windy streets of the Mother City to give the X100T a bit more of a workout.


In between watching the magnificent weather and 60km/h wind blowing ocean spray past the window, I had started on the X100’s manual. As an inveterate aperture priority shooter, I’d ignored Auto ISO on all my cameras up until now. With early winter in the northern hemisphere just a few days away and uncertain conditions ahead, this now seemed a good place to do some experimenting. I set ISO max at 800 and a minimum shutter speed of 1/125 – Cape Town is very bright in full sun and it’s a simple change to set up another profile for ISO 3200 or higher before I leave for overseas. With those settings and the entirely silent electronic shutter, I reckoned I’d be well set.


Which I turned out to be. And the pictures?


In a word; brilliant. the Fuji’s RAW files render really well on screen and despite my dislike and clumsiness of Lightroom, have to admit that the combination delivers really satisfying, saturated images and excellent b/w conversion (using the aforementioned SilverEFX Pro). I’ll try printing when I get back.


Let me walk through a couple here:


The perfect boot print

The perfect boot print


The perfect boot print – I think this is a great illustration of the Fuji’s ability to render colour, contrast and the absurd. The colours show up really well, to which I added a bit of additional saturation in the reds. The black paint on the kerb stone has a blue hue, which is correct – it’s the reflection of the incredibly blue sky overhead. And that perfect boot print…


The Marble Halls of Plein Street

The Marble Halls of Plein Street


The Marble Halls of Plein Street – I would guess this tested the Fuji’s dynamic range to the max. From the brightest of daylight reflected off the walls above the fire escape across the road, to the dark corners and shadows inside the entrance hall, I’d say that this was the sternest test I’d found to date and the X100 passed it with flying colours. The SilverEFX Pro conversion just needed a bit of structure dialled in and a no.2 vignette.


Haircut

Haircut


Haircut – almost completely as it came out of the camera. A tiny curves edit and a dab of Clarity. The Fuji seems to understand mixed lighting and made a single incredible exposure from both fluorescent and some daylight.


If there is a downside to this extraordinary camera, I’m finding my large hands an issue with the X100’s many rear panel buttons, but that’s not the camera’s problem and I will master those sooner or later. The LCD isn’t much use in Cape Town’s brilliant sunlight, but the viewfinder works perfectly, either in optical, or electronic mode.


I’m now pretty much packed. The Fuji will go into my backpack with the now relegated to backup NEX-7 (with a couple of lenses) and tomorrow, me ‘n Mrs P get the iron chicken first to Dubai and then on to Tokyo. I can’t wait…


Oh yes. Please don’t mention rugby.


Posted on DearSusan by paulperton.

#301. The X100T stretching out.

$
0
0
Waiting to cross

Waiting to cross


More than a two thousand images on the Fuji since part two, all of them shot in Tokyo.


Shinjuku temple

Shinjuku temple


I’m finding my way around a bit more now, trying this and that combination. Overall, I’m as impressed as hell.


Pink door, Golden Gai

Pink door, Golden Gai


Here’s some facts in no particular order:


The X100T needs a fast SD card. When I started out, I loaded a 30MB/s SD card I’ve used elsewhere and then felt that the write/read performance was a bit slow while out shooting. Deciding to splash out on a couple of new 64Gb 95MB/s cards made a radical change. Several shots that I’d missed in various after dark spots had been put down to the X100’s slow processing, were in fact the SD card’s glacial write cycle holding things up. A lot.


So much so that I think I might go see how much impact an even faster card might have.


Going elsewhere

Going elsewhere


Fuji need to make some kind of provision to toggle/disable the buttons on the X100T’s rear panel. I have big hands and long fingers. With the X100 in hand, they seem to have a mind of their own and press all manner of buttons at random. Sony made it possible to switch off the NEX-7’s critical controls. Maybe Fuji could do the same?


Update – as I expected, I’m getting used to the X100’s buttons, but still long for a “Buttons off” option.


The wi—fi pairing with my iPhone is a brilliant concept for discrete photography, but rarely connects first time – usually requiring a re-launch of the app. Great idea but please fix the connectivity.


Wood store

Wood store


The top panel controls move too easily. This seems to have been a problem with the previous models of the X100, which has subsequently received attention from Fuji’s apparently attention-paying marketing/technical team(s). Despite that, I’ve still managed to move the shutter speed dial off my preferred “A” setting on a number of occasions, finding myself unwittingly shooting at 1/4000 sec – several stops away from where I wanted to be – and cursing at the results.


Pre-dawn bike store

Pre-dawn bike store


The X100T’s RAW files are full of data. On one occasion, I thought that the change from “A” to 1/4000 would cost me a keeper. Not so. +2.75 exposure change in Lightroom and as much detail as I could possibly want showed up in my shot. Otherwise, shadow and light detail are similarly rich, even in way less than optimal exposures.


The manual is written for people with ESP. There seems to be little or no mention of several critical functions – Ken Rockwell insists that the face recognition functionality helps a lot in street/candid work, helping find face focus quickly and with the minimum of stress.


Yeah? You might find it in Fuji’s owner’s guide, which sets new standards in brevity. I couldn’t.


The electronic shutter is totally silent. Yup.


The entire imaging system copes with complexity incredibly well. Take a look at this image and tell me otherwise.


Complexity

Complexity


I barely need a tripod any longer. See some of these still dark and pre-dawn images for yourself.


Pre-dawn

Pre-dawn


As with most cameras that please when everything comes together as it should, the X100T is deeply satisfying when it delivers the eyelash focus I want, the shallow DoF I bought an f2 lensed camera for, or blends daylight and other light sources almost faultlessly. And, in discovering those things, I’m finding the X100 a great match against my street shooting expectations. At anything from ISO 100 to 3200 it’s quick to focus, delivers rich, well textured images that work well in post processing to deliver what I’d wanted when I bought this little gem.


Non-empirical mark? 8.5 out of 10. 9 might be a fairer response, but I don’t have enough experience with it in-hand yet. I’ll revisit that soon, I suspect.


Unexpected find

Unexpected find

Posted on DearSusan by paulperton.


#305. Totally useless post! Capture One v8 Vs Capture One v7 (Vs. LightRoom)

$
0
0

My shoot-out post Capture One Vs Light Room was an eye-opener. Quite a few readers agreed that Capture One was the better software. And each of them indicated that he wasn’t going to change. Nobody challenged my assertion that making my pictures better for 110€ was the best deal in photography. And nobody took me up on it. The post became one of the most widely read on Dear Susan, and it made no bloody difference. Even though DS readers are interested in high-quality photography , not one wrote back to say that he (she)’d changed over to Capture One. Basically, they couldn’t be convinced. Or rather, the burden of changing over was just too much to make it look worthwhile.

Suddenly this “I couldn’t be bothered”, or “it’s just too long and hard” attitude goes a long way to explaining why compact camera sales are dead, and why all camera sales are falling off a cliff. This is because people are taking pictures not with cameras but with smartphones and even tablets. Once more, the iPod, portable and easy to use, wins despite its screechy sound quality over audiophile sound systems.

Thus my report on the new version of Capture One is totally useless, because nobody is going to change over to it. Since my previous post, Sony and Phase One did a major deal. Anyone buying a A7 camera gets a free full-featured-but-Sony-only version of Capture One Pro. Sounds exciting for both Capture One and customers. Except if buyers are already used to another brand of software, because, then, they won’t be arsed to change.

On with the comparison

OK, enough with my surly attitude. If I really believed that you aren’t interested, of course I wouldn’t write what you wouldn’t read. So, on with it! How much improved is version 8 over version 7? The answer is: much! More than the 69€ I had to shell out to get it.

Capture 1 v7 vs Capture 1 v8

There are 3 differences that in my view easily justify the upgrade. One is a “heal” tool to complement the “clone” tool. The latter lets you clone out something that ideally shouldn’t be there. But cloning out rarely works perfectly, because it is rare to have a zone of the right size, subject and luminosity to perfectly replace the unwanted one. The heal tool, comparable to the similar one in PhotoShop, takes care of a good portion of the problem by adjusting luminosity, making the replacement much more even and seamless. Score 1 for the good guys, even though this is hardly earth-shattering.

The second difference, more important in my view, is that the HDR tool is much improved, even though it already was much better than LightRoom’s, as per my previous post. In version 7, if you tone down highlights, or if you lift shadows, beyond a certain amount of adjustment, you get an effect on the mid-tones, which goes toward giving them a washed-out look. Meh! In version 8, you can push the shadows all you want, or mute the highlights, and it has no effect on the midtones, which remain punchy.

Which brings me to the major improvement: advanced layer management. In Version 7, you could do masks and layers, like in PhotoShop, which you can’t do in LightRoom. In my view a major feature. But you only got a limited number of adjustments in the layer you’d just created, basically the various parameters for exposure, sharpness and clarity. In version 8, you get much more, because you get pretty much the same as for the whole picture. Now you also get white balance, and HDR, clarity, noise reduction, etc. Which means you can selectively adjust white balance if your picture incorporates mixed lighting, such as artificial in one are, and natural in another, beacuse it is close to a window. Or you adjust highlights and shadows selectively as well. Which means, if the improved HDR tool is not powerful enough for you, you can design a layer and double the effect by using the selective HDR tool on the layer only. Super neat!

There are many more improvements, including in the user interface, the loading speed, the stability, the RAW converter (this you can see for yourself and form an opinion). That is, if Capture One are to be believed. I ran a single test on speed, and C1 v7 was quicker by some 25% over v8 when it came to importing 23 pictures.

But, as I said previously, none of this ultimately matters, because none of you are going to make a change. So why write the post at all? Just to rain on your parade, so that you know what you are missing out on. Not very nice, is it? Well, that’s the sort of guy I am. Enjoy your LightRoom, fellows!

Show me !

Now, enough prattle, to the pictures! C1 V7 vs C1 V8 vs LightRoom!

195

DSC00963

What you have above is the same RAW picture, processed first with C1 v7, then with C1 v8, but left totally without post-processing. This gives one a comparison of both RAW processors, since C1 claim that it is improved. Note: the file size is exactly the same, so there is no increase in information. The choice of this picture is because it has a very light sky, part of it burned, which begs for highlight recovery. And the beams provide an opportunity to judge colours and contrast.


In the pictures below, the same sequence, but with the HDR tool used to the max. Look at the impact on the sky, and on the building. Top picture in V7, then V8. I rest my case. In my opinion, Capture One deliver on their promise, highlight recovery is indeed much improved. More information is recovered from the clouds, yet the midtones remain less impacted.

197

DSC00963_2

Now here is the same RAW processed in LightRoom.  Picture n°1 is the RAW without any processing, and n°2 the same with maximum highlight recovery. Interpretation of that needs to keep in mind that LR could have more or less recovery, and that wouldn’t necessarily be better or worse than C1. What matters is what impact that has both on highlights, and on the rest of the picture.

DSC00963

DSC00963-2


Now one more series. 3 pictures, each processed with its software, based on each software’s capability. So the processing is not the same, because the software isn’t. First, C1 v7, then C1 v8, then LightRoom

198

DSC00963_3

DSC00963-3

If you compare them, you see that, in order to get some “life” from the burnt-out clouds, I need to darken the picture with C1 v7 and LightRoom, to the extent that, in LightRoom, the corridor in the bottom center is almost totally dark. And if I then pull up the shadows, the overall impact is negative because the lower contrast makes the picture less “alive”. For my taste, C1 v8 gives me the lightness and warmth I like without resulting in burnt-out, informationless clouds

Now I have refrained from passing judgement on what is “better”, because that may be a function of our sensitivities and priorities. Besides, methinks you are able to make up your own minds, and decide for yourselves. I may be able to help by showing the result of certain tests, but you don’t need to be told what to think and choose. So, friends again?

Oh, and because you have suffered enough through this post, a couple of other pictures from this Frank-Gehry-designed Louis Vuitton Foundation

DSC00957 DSC00965_1


Posted on DearSusan by philberphoto.

#307. Tilt-Shift Lenses : Are They Worth It? (a.k.a a Mirex Adapter Review)

$
0
0

When you’re a cheap lowlife like me who’s unwilling to fork out the 20-60 big ones required to secure a top-notch technical camera system such as those offered by Alpa and Arca Swiss, two options are available to you in order to enter the world of Scheimpflug principles and keystone shifts on the cheap :

  • Tilt-shift lenses, either ready-baked or – as described here – assembled using a dedicated adapter.
  • Computer-based post-processing.
The Mirex Adapter with a Mamiya 645 lens on a Sony A7r camera

The Mirex Adapter with a Mamiya 645 lens on a Sony A7r camera

Which is better really depends on how dedicated you are to the fields best served by the corresponding image manipulations. But here is a brief attempt at describing the pros and cons, doubled-up with a short review of the Mirex adapter, one of the tools of the trade you’ll want to know to dip your feet in the water in a quality but affordable manner.


What’s this all about ?

In many circumstances, specialized photographers cannot rely on depth of field alone to secure focus over the important parts of a scene, or on the natural geometry of parts conveyed by standard lenses.

Think of architecture photography and the strongly converging lines of short focal-length photographs made pointing upwards. Or think landscape photography when an important subject is very close to you but you want to keep the background sharp and cannot achieve this, even at a diffraction inducing f/22. Think of the gimmicky miniature effect found deep in the “artistic filter” menus of most mirrorless cameras. Or think panoramic frames that do not fit in without dedicated apparatus.

Enter the technical view-cameras and their range of movements allowing us to control the perspective along 2 axes as well as the angle and depth of the plane of focus. I won’t go into detail about how this works. For a delightfully romantic explanation, I strongly recommend St Ansel’s book: The Camera. If you’re on too strict a time budget to let the enthralling words of our forefather infuse happiness into your very bones, YouTube will substitute well.

Miniature effect - A7r, Mirex Adapter and Mamiya 150mm f/2.8 lens

Miniature effect – A7r, Mirex Adapter and Mamiya 150mm f/2.8 lens

View cameras can do many wonderful things.

By swinging their (film-bearing) rear-end like Beyoncé, they let you control the shape of what is captured by the film and the resulting perspective. By shifting it (relative to the front end) they capture an area of the image circle that is further out from the center of the image, such as tall buildings, without requiring you to point upwards, therefore avoiding the keystoning effect.

Scheimpflug swing principal

(c) Wikipedia

Finally, by swinging the front-end (lens-bearing) relative to the film-plane, they allow you to select a plane of focus that doesn’t have to be parallel to the film/sensor itself. This effect, described by the Scheimpflug principle,  is particularly useful as it lets you control the depth of field (via aperture) independently to the actual orientation of the plane of focus.

Two opposite applications of this principle are:

  • Miniature effect (see silly photo above and silly photo below) : open up the lens for narrow depth-of-field and tilt the lens sharply (horizontally or upwards, vertically) to skew the plane of focus relative to natural.
  • Maximum depth of field : close the lens for increased depth of field and tilt the lens downwards to tilt the plane of focus along the “ground”.

You can see both side by side below :

Miniature effect with a vertical shift using a Mirex adapter on a Sony A7r camera

Maximum depth of field

Maximum depth of field

Minimum depth of field


Enough with the boring talk. Is it worth it? And what is that Mirex adapter?


About the Mirex

Mirex is a small German company who produce a very fine adapter that sits in between medium format lenses and full-frame (or smaller) cameras.


The Mirex Adapter (c) Mirex

The Mirex Adapter (c) Mirex


But, unlike conventional adapters, it lets you use several of the front-end movements found in view cameras, in particular :

  • Lens shift (as in first photograph on this page and the photo above)
  • Tilt, in one direction (combined with the shift)

It also lets you rotate the lens 360° relative to the body so that the shift can be vertical, upwards (to “point” the camera upwards without introducing keystone convergence) or downwards. It can be horizontal (for instance to capture a panorama) and anywhere in between. Likewise, the tilt can be made in any direction you wish.

Build is exceptional and the variety of movement concentrated in such a small (yet sturdy) object, is bewildering.

It is made in mulitple versions to accomodate lenses from Hasselblad, Pentax and Mamiya in the front and a variety of digital cameras in the back. I use mine in Nikon mount with a Nikon to E-mount adapter, and with 3 very nice Mamiya 645 lenses (45/2.8 55/2.8, 150/2.8) with an urge to buy the 80mm f/1.9.

The main (only ?) drawback of the Mirex, is the obligation to use lenses above 35mm. If you want shorter than that, tilt-shift lenses such as the famous 24mm contenders are a better option (and a far more expensive one, too).


Correcting perspective

Point your camera upwards at a tall building and its photograph is full of converging lines that many find objectionable (debatable in itself).

Keep the camera pointing horizontally at the foot of the building and raise your lens through a shift and you capture the top part of the building without any of the convergence.

But this optical magic comes at a price. However good in their time, most medium format lenses you’ll be using with a Mirex see their optical quality deteriorate quite significantly when you get too close to the edge of their image circle (the circle on which they project an image is larger than the 24×36, because they are medium formal lenses, which is why you can move the lens about relative to the sensor, but there are limits).

DSC_6907

Ye ol’ keystrone convergence


Ye new 1-clic correction

Ye new 1-clic correction

For that application, clicking a single button in post-processing software gives you the same result with an image degradation that usually isn’t as important (all depends on the quality of your lens, but it’s a very rare lens indeed that doesn’t degrade much with a 15mm shift).

Post-processing: 1 – Tilft-shift: 0


Stitching

Stitching serves two purposes : increasing the angle compared to one a single frame can capture and/or creating more pixels in your image. For instance, when creating panoramas.

I actually bought the Mirex to stitch 24×36 frames into the 4:3 format God intended all photographs to have until Oskar Barnack ruined life for photographers (ahem). Too lazy … I never did. Still, the Mirex is an excellent tool for the job.

A panoramic monochrome photographs of the hills of Provence

Hills of Provence

Amateur panorama creators usually swing their cameras in a broad arm-length arc that takes in the scenery to be included. Quite quick and quite dirty :

  • The position of the lens being greatly changed between frames, each photograph displays close object in a very different position relative to remote objects. To see how strong this effect can be, raise a finger 10 inches in front of your face and blink your eyes left right left right. Notice how far it “moves” relative to the background ? The same happens in each of your shots, if you have foreground objects.
  • The lens you use is very rarely orthoscopic (without distortion) so each individual picture is a barrel-distorted or pincushion-distorted (or worse) image of reality that will never line up properly with the next.
  • Unless you are a Terminator, none of your individual frames will be horizontal or aligned with the next.

For all these reasons, creating panoramas with an arm-sweep technique requires very clever software such as AutoPano Pro to get rid of the mess and produce a clean output.

Original frames of a multi-image panorama of the hills of Provence

The original frames

The two photographs above are ample proof that the method works. But the Mirex is a far preferable solution if you’re half serious about panoramas.

First of all, you’ll be using it on a tripod. You don’t have to, but going to the length of shifting a lens while refusing a stable base would speak negatively about your mental health to the casual onlooker. So, you’ll be using a tripod and you’ll be level.

Secondly, and most of all, with every individual frame, you are capturing a fragment of a unique image. Essentially, your lens is projecting a large picture of a scene and you are grabbing a horizontal slice 24x36mm at a time (*). This means all you need to do is place the frames side by side and they will overlap perfectly. No fancy maths to deconstruct/reconstruct the image, no weird jaggies, no messing about with layer masks to clean up some bits the software couldn’t take care of alone. In both cases, you’ll need software to stitch individual frames, but with the cleaner initial shooting technique, the software can be simpler and introduces less degradation.

(Lazy) Post-processing: 0 – Tilft-shift: 1

(*) Actually, that’s not entirely true. You are moving the lens relative to the sensor with the Mirex. Ideally, the lens should be fixed to the tripod and the camera should be moved about behind it. Other adapters work exactly in that way, but their build or pleasure of use doesn’t come anywhere close, so I’d still stick to the Mirex.


Manipulating focus

Imagine three planes : one defined by the film / sensor. A second defined by the lens (normally parallel to the first, and in front of it by one focal length’s distance). And a third where objects in frontof the camera are in focus. For the sake of simplicity, let’s assume that all lenses in the World are Planars and that the disturbing world of curved focus surfaces exists only in spooky bed-time stories (for bad photographers who support h 3:2 format). When you tilt one of the first 2 planes (let’s vertically, downwards), the two intersect in a (horizontal, in this case) line (the Scheimpflug intersection),  and focus is carried on the plane that intersect the first two on exactly that same line.

DSC02350

If you click this photograph to enlarge if, you will see the oblique plane of focus going through the trees on the right, the near rear-light and towards the center of the frame.  Here the lens was tilted horizontally and to the right. The depth of field is seen clearly (about the width of the red tail light) and is very shallow because I shot wide open. The very sharp transition between sharp and very unsharp is what gives us the “miniature effect” that makes the car look like a toy. With a smaller aperture, the apparent width would have been greater, up to 4 times as much. More interesting, had I tilted horizontally and to the left (not the right), I could have had the whole side of the car (and tree on the left) in perfect focus and the background trees on the right completely blurred. Playing with aperture, I could have decided how much of the back of the car (which would have been at right angles to my plane of focus) was to be in sharp focus.

Neat!

Most cheap cameras come with a miniature effect filter that offers less in the way of control but usually provide equally pointless images. So, call that a draw.

On the other hand, landscape photographers wishing for focus from their toes to infinity and close-up photographers wishing to work on oblique objects have very little choise : adopt the Scheimpflug principle or die their hair white from the inside using focus stacking software.

Post-processing: 1 – Tilft-shift: 1


In conclusion

The score is a tie and your mileage will obviously vary depending on your kit and shooting preferences. In my opinion, the effort isn’t worth the results.

K.I.S.S.

K.I.S.S.

The Mirex is an excellent piece of equipment but the limitations this style of shooting imposes simply do not translate into significant enough advantages, for me. I find I am better (or, rather, more easily) served by conventional lenses and post-precessing software. Losing the convenience of a snappy shoot without gaining the real-life image-quality improvement you’d expect of a good medium format system simply makes no sense, in my book. There simply aren’t any image manipulations I need that I can’t simulate via software. And, no, stitching fils doesn’t give you that elusive medium-format look. More on that soon.

If you already own medium format lenses, on the other hand, do yourself a favour and get one now. It’s a lot of fun to experiment with. I’m now selling mine with all 3 Mamiya lenses at a bargain price. Want it ? Drop me a line in the contact page :)


Posted on DearSusan by pascaljappy.

#315. The Zeiss Distagon ZM 35/1.4: First Impressions on a Sony A7r

$
0
0

There’s a myth in the amateur astronomy community that all too often comes close to reality. Whenever you’ve waited months, possibly years, for a new telescope to be shipped to your home, it arrives in the middle of an ark-proportioned downpour that lasts for weeks.

And so it is of Zeiss’s much-anticipated Distagon T* 1.4/35mm ZM M-mount revolution of a 35 mil lens. Maybe it’s because I am hoping to use if for night-time photography and possibly astrophoto. But the sad fact is that after a 4 week respite from torrential rains, wet weather – as in very – resumed this morning, just before the lens was delivered to my door.

The best laid plans of Zeiss and men …

A Zeiss Loxia 50/2 next to Zeiss's ZM 35mm f/1.4 lens

Range competition : Loxia vs ZM

Still, the lens has arrived, as a 2 week review loan courtesy of Zeiss France to whom I wish to express my sincere thanks. If very, very early impressions are anything to judge by, they’ll have to chase me all the way to South America to get their lens back ;)

What can I show you to justify this claim, so early in my review (roughly 10 minutes and 20 frames) ?

Cat portrait using a Zeiss Distagon 35mm f/1.4 and Sony A7r

Tap lap

Sadly, not a lot. But I have seen enough to formulate meaningful first impressions.

One of the ambitions of my review was to check whether this 2000€ Distagon is an OTUS 35. After all, given the lower technical constraints of an M-mount and far lower cost of production (less glass, less metal, simpler design) 2000€ is vaguely consistent with the OTUS 55/1.4’s asking price.

Long story short: It isn’t. It didn’t take more than 10 frames to see technical glitches creep into the frame, and not just the corners. Chromatic aberration is present, as is well-managed but significant image quality degradation as aperture grows wide.

And that’s a good thing ! Why ?

A group shot of a Sony 35/2.8 FE, Leica Summicron-R 35mm, Zeiss istagon ZM 35/1.4 and Zeiss Distagon 25/2

Family portrait – the usual suspects plus one

Well, I might later eat my words, but this seems a more intelligent design than the full-on OTUS 35 might have been.

See the first picture on this page and the group portrait above. The Distagon ZM 35/1.4 is a compact lens. On the left is the tiny Sony/Zeiss 35/2.8 lens, a full 2 stops slower. 3rd from left if my battered but I-can’t-part-with-it Leica Summicron-R 35/2. And on the right a Zeiss Distagon 25/2 ZF2, that is dwarfed by the 35/1.4 from the same stable.

It feels … perfect. The focusing tab is well placed, the focusing ring is butter smooth yet perfectly damped. The aperture ring clicks into perfectly defined 1/3 stop notches.

It also feels … scary. There is glass everywhere, from 1mm inside the mount to 1mm behind the front ring. And the lens doesn’t come with lens shade so glass protection is minimal and a bit nerve-wracking when even Noah’s got his umbrella out.

Grass growing into an abandoned bicycle. Sony A7r and Zeiss Distagon 1.4/35 ZM

Abandoned bike

So: great build, good size, great ergonomics.

The second reason for my early joy is that, in spite of the imperfect optics mentioned above, this lens seems to do everything that matters absolutely wonderfully !

Lab rats will be all over this lens with their negative remarks. Artists will hand it over to their great grand children as a treasured family heirloom.

Enough hyperbole, let’ be more accurate.

Colour.

Colour is amazing. As previously hinted at, it pisseth like there’s no tomorrow and the ambiance is as drab as a Lucien Freud painting in a Ken Loach movie. Would you tell from the above photograph? Or the one below? These were shot just before nightfall and are straight out of camera, with only the Sony’s built-in mustard filter removed by a click on AUTO in LightRoom’s light balance menu.

Come on ! Gear has no right to be that good, what shall we blame our lousy shots on?

A pair of abandoned bikes in wet weather, Sony A7r ans Zeiss Distagon ZM 35/1.4

Old bikes, old grass

The transparency of the image belies its 10 lens construction. The impeccable colours and very organic feel are what I love most in a lens. While ultimate neutrality might be truth, I can’t help feel a microscopic coat of varnish added to the rendering makes the images incredible pleasing yet very (very) natural looking.

In that respect, the 1/4/35 ZM Distagon might better both the Loxia 35/2, based on a slightly harsh ZM 35/2 design and the Summilux 35/1.4 that adds a little more of its own gravy to the imagery. We are talking nuances and personal preferences here, but given the conditions these photographs were made in, I’m in love.

Finally, let’s get back to that filthy image degradation I referred to that may have sullied your perception of this expensive piece of glass.

Green flowers and thorns, sony A7r, Disaton T* ZM 35mm f/1.4 Zeiss lens

Winter green

Here again, design choices seem very intelligent. In the frame above, captured at a silly (for the scene) f/1.4, sharpness is clearly lower than at f/5.6. But only at 100% on a 6-foot wide image and not so much that you feel cheated at all. More importantly, the corners are not that much more fuzzy than the center. Sharpness seems to fall gracefully throughout the frame, with the corners giving up a little more than the middle but not disgracing themselves at any point.

Finally, bokeh is, shall we say, not bad. Possibly the best I have seen in any lens. See below, again at f/1.4 and straight out of camera.

DSC00196

Tomorrow morning, I’m off at sparrow to meet co-author Philippe in Paris, where we will be walking in the quartier latin to evaluate the lens more intelligently than these few minutes allowed. After that, I have a lot lined up to compare the lens to all of the above 35’s and possibly a Summilux FLE, if I can lay my hands on one (if a reader wants to send his over, I’ll be very careful with it).

Let me leave you a few final (uncorrected, save for added vignetting) shots. Stay tuned for a much more thorough review of this awe-inspiring beastie.

DSC00202 DSC00204 DSC00209


Posted on DearSusan by pascaljappy.

#317. Zeiss Distagon T* 1.4/35 ZM: The Full Review

$
0
0

My loaner period is already half exhausted! The ZM 35/1.4 has been with me for a week now and I have made several hundred exposures with it. Time for more detailed comments than my quick initial impressions.

Unlike my previous review of the immensely lovely Loxia 50/2 lens, I will not be comparing the Zeiss Distagon T* 1.4/35ZM to its competitors in this post. By itself, the lens warrants a pretty long article and the comparison with the Leica Summicron 35/2 and Sony-Zeiss 35/2.8 FE will have to wait a few more days.

DSC00578-Modifier

In this post, the ZM35 rules. It’s all about that intriguing lens that is not without flaws and yet has to be the most desirable I have ever used. Ever.


Colour

Here are 2 examples of photographs made at night, at time when artificial colours can flood the frame, but also be a challenge to recreate properly. These two samples are not straight out of camera like many others on the page are. Instead, I have chosen to make colours bold and strong, to show how natural they remain when pushed.

Joan Miro going shopping in La Défense, Paris. ZM 35/1.4

Joan Miro going shopping in La Défense, Paris. ZM 35/1.4

The big forbidden slide in La Défense. ZM 35/1.4

The big forbidden slide in La Défense. ZM 35/1.4

This second photo in particular is a spectacular result from what was just a grey-blue wall of concrete with pale lighting from office buildings on the right. The image took a bit of massaging for this result, but the fact it was even possible given the original scene is a testament to the quality of both the lens and the sensor. The two make a remarkable pairing for anyone interested in colour photography.

During the day, and with more restraint from the post-processing hand, there’s no dilution of colour and the potential for playfulness is evident (and partly indulged in on the first sample, taken at full aperture)

That little river they call La Seine - Zeiss ZM 35/1.4 at full aprture

That little river they call La Seine – Zeiss ZM 35/1.4 at full aprture

The glass houses of the Jardin des Plantes in Paris. Sony A7r, ZM 35/1.4

The glass houses of the Jardin des Plantes in Paris. Sony A7r, ZM 35/1.4

Colour shift

No, not the magenta hues in corners that foretell the mush that is typical of some wide-angle M-mount lenses used on the Sony A7r. There is none of that to be found anywhere, at any aperture or any focusing distance.

What I am referring to here, is the change of colour cast as you change aperture. I will spare you the full range of 1.4 to 16 test shots, but here are f/1.4 and f/8. The change is very subtle but it is there.

@ f/1.4

@ f/1.4

@ f/8

@ f/8


Skin tones

See Closeup performance, below.


Black and white ?

Oh yes !

My optical tastes for B&W lean towards the gritty, the flared, the flawed lenses that add presence to the scene. Very old Leicas and Voigtlanders, for instance. The ZM 35/1.4 is clean as a whistle, with perfect transitions and neat surfaces.

And yet …

Jardin des plantes

Jardin des plantes

Inside Saint-Etienne du Mont

Inside Saint-Etienne du Mont

Towering

Towering

Room with a view

Room with a view

What this lens does that few others can achieve, is preserve a lot of micro information that make the final image lifelike and full of depth. The other side of the coin is that it leaves the photographer with more work to create something that is not an identity picture.

Either it’s not my type of lens for monochrome photography, or I just need to work harder, but my first initial weren’t that fascinating. After a few days, things started to look a lot more promising. And for the real expert who wants as much information in as possible the file in order to free his interpretation of upstream degradations, it’s right up there with the best there is.

It doesn’t do the work for you like a quick fix Instagram filter. Quite the opposite in fact. But this lens mounted on a quality monochrome sensor would probably be a recipe for (hard work and) great results. Now, if anyone would like to lend me their Leica Mono … ;)

A sunlit alley in a stony sburb of Marseilles, Les Goudes. Zeiss ZM 35/1.4 Distagon T*

Summer in Winter

Master and dog

Master and dog


3D

All great Zeiss lenses shine in their ability to render layers and depth brilliantly and the Distagon ZM 35/1.4 is no stranger to that mystification of the mind.

The Gare Saint-Charles in Marseille, Sony A7r and Distagon ZM 35/1.4

Waiting for the train

You’re either receptive to this quality or you’re not. I love old Leica lenses for their matte, flat rendition. But scenes such as this (above) almost give me vertigo so strong is the sensation of depth. The ZM 35/1.4 strips the image of all unwanted optical detritus and renders such scenes with utmost transparency and depth.

Depth of field is strong with the Zeiss Distagon ZM 35/1.4

Les 4 temps

The photograph below is largely uncorrected (only white balance and vertical convergence). It is slightly underexposed and not that well composed, but the volume of the Imax cinema is almost palpable and the stairs pull you strongly into the Dome shopping center, don’t they ?

A mall in La Défense - Sony A7r and Zeiss ZM 35/1.4 DIstagon

The moon and half dome ?

Even when the photograph itself does not include strong depth cues such as converging lines, the layering of planes is beautifully rendered.

Esplanade

Esplanade

The stained glass inside Saint-Etienne du Mont church in Paris. Sony A7r and Zeiss ZM 35/1.4

Pictures at an exhibition

Sharpness, that big issue

“Amazement awaits us at every corner.”
James Broughton

Click for 100% view (large file)

Click for 100% view (large file)

Let’s get it out in the open right away: the ZM 35/1.4 is not without fault in the corners.

The photograph above was made at f/8. You can access the 100% version by clicking on it. As you can tell, corners are *very good*, thought not as good as the *excellent* center. And at 100% on a typical screen, this image is over 7 feet wide! At the usual A3 print size, it would take a loupe and a very fine print indeed to reveal any differences between various zones of the frame.

Other apertures are not as plain sailing, though.

The small port in Callanque de Callelongue, Marseilles, photographed with the Zeiss ZM 35/1.4

In Callelongue – ZM35/1.4

Some photographs on this page will reveal that corner (or even edge) performance can sometimes be a tricky issue.

And tricky is the adequate term as it doesn’t seem easy to pin down the exact source of the issue in any repeatable way. In fact, my guess is it is a combination of 4:

  1. Slight field curvature. I tried to analyze this by taking photographs of wavelets with very little success. In my sample the “plane” of focus did not seem very strongly curved. I would venture the surface is concave, with the center of the field focusing closer than the corners (the church below is sharp in the center tower and on the right, for instance). It did seem a little oblique, which I cannot explain.
  2. Filter stack. Contrary to my initial, optimistic assumption, it does appear that this ZM 35/1.4 is indeed optimized for a Leica filter stack and the lens suffers on the much thicker Sony A7r design.
  3. Focusing distance. The lens seems a lot happier at mid to close distance than at infinity.
  4. Zeiss’s mature attitude towards sharpness (important, but not a priority compared to other characteristics)
The Montredon church in Marseille. Sony A7r with Zeiss Distagon 35mm f/1.4 ZM

Eglise de Montredon

All this conspires to make the lens a typical Distagon (OTUS excepted), the ZF2 35/1.4 behaving the same and the ZF2 25/2 itself being a similar, though worse, offender. Whether the issue is severe enough to stay away from what is, in all other respect, a magnificent lens, is really up to your expectations and intended use. I cannot imagine a street photographer ever being displeased, but some landscape specialists might think otherwise. The reality of it is that – to my eyes – sharpness is never lacking and the whole subject of it pales compared to the other wonders this lens has to offer.


Purple Fringing

This came as a bit of a surprise. Purple fringing is quite present, even severe at the widest aperture.

By f/2.8, all is usually taken care of, though the psychedelic edge tendency can extend beyond f/4 on very strong highlights.

Thankfully, chromatic aberration is the easiest to cure in post-processing, requiring only a gentle shove of a slider. But the slider almost felt rusty on its outer reaches, so long a while it has been since it needed to be pushed that far.

purple fringing on the Zeiss ZM Distagon 35/1.4 at f/1.4

@ f/1.4

purple fringing on the Zeiss ZM Distagon 35/1.4 at f/2

@ f/2

purple fringing on the Zeiss ZM Distagon 35/1.4 at f/2.8

@ f/2.8

purple fringing on the Zeiss ZM Distagon 35/1.4 at f/4

@ f/4

On 95%+ of my photographs, CA is either absent or not an issue. But on one overexposed shot of the sea in strong sunlight, this and the odd-mannered sharpness characteristics described above contributed to make the resulting image look like the work of a troubled child.


Vignetting

What intelligent words can I put on this? Vignetting is very predictable: relatively strong at f/1.4 and almost totally gone beyond f/2.8. Expose to the right and you will find correcting the corner darkening very easy. Here are some photos to illustrate the vignetting at maximum aperture on neutral and low contrast subjects (from a fast-moving train :) )

DSC00247 DSC00251


Distortion

As you can tell from the following photo, the ZM 35/1.4 displays very slight barrel distortion. This is one of the few frames (out of 600) in which I have felt the need to correct it.

The Zeiss ZM 35/1.4 Distagon displays slight barrel distortion

Slight barrel distortion

A very good performance, then. But the architecture-minded photographer might object to the slight wave distortion found once you get rid of the barrel component. See corrected photo of the glasshouse, in the sharpness section, above. The very top of the house frame and the bottom, where it meets the pavement, are where this is most obvious.

You’ll need to be very geometry-focused to object to this in real life, though.

DSC00463

The first sky-scraper in Paris


Flaring bugaboos

The famous stairs of Marseilles train station in the storm - ZM 35/1.4

The famous stairs of Marseilles train station in the storm – ZM 35/1.4

Remarkably glare-proof, the ZM 35/1.5 is not immune to flaring and disturbing internal reflections.

Predictably, matters are far better as you close down (f/8, below) than at full aperture (above, where contrast and clarity are pushed to accentuate the issue). The general diffusion around highlights is very well controlled at f/1.4 and never extends far beyond the light source. But reflections such as the purple UFO beams above should be expected throughout the frame. Short conclusion : horses for courses. As excellent as this lens is at full aperture, do not expect miracles from it and if clean results are required, stick to f/4 and beyond.

Calder in the garden - La Défense, Paris. Sony A7r and Zeiss ZM 35/1.4

Calder in the garden – La Défense, Paris. Sony A7r and Zeiss ZM 35/1.4

Bokeh

At full aperture, this lens’s bokeh is more cream than Eric Clapton himself.

DSC00720 DSC00722 DSC00732 DSC00737 DSC00743

Things get just a tad more nervous at smaller apertures (f/2 and F/2.8 below) but I have never found background burble objectionable at any point. Excellent performance.

DSC00709 DSC00711-4


And what about highlights ?

Many lenses with nice looking bokeh tumble badly on highlights. The lovely Leica Summicron 35mm f/2 is such a case, for instance. So here is a complete set of photos from f/1.4 to f/11 showing you what these look like on the ZM 35/1.4

As you can tell, handling of highlights is excellent. No accentuated edges (a very rare trait) to draw attention away from the main subject, no coma (see Summicron 35 review, above) and no other recipe for unpleasantness I can think of.

Let’s call that a 9, the perfect 10 slipping away because of the slightly angular (rather than perfectly circular) shape of out of focus highlights, their “flat” nature (as opposed to fading on the edges) and some faint onion rings.

Zeiss Distagon ZM35/1.4. Bokeh : specular highlights at f/1.4

Bokeh : specular highlights at f/1.4

Zeiss Distagon ZM35/1.4. Bokeh : specular highlights at f/2

Bokeh : specular highlights at f/2

Zeiss Distagon ZM35/1.4. Bokeh : specular highlights at f/2.8

Bokeh : specular highlights at f/2.8

Zeiss Distagon ZM35/1.4. Bokeh : specular highlights at f/4

Bokeh : specular highlights at f/4

Zeiss Distagon ZM35/1.4. Bokeh : specular highlights at f/5.6

Bokeh : specular highlights at f/5.6

Zeiss Distagon ZM35/1.4. Bokeh : specular highlights at f/8

Bokeh : specular highlights at f/8

Zeiss Distagon ZM35/1.4. Bokeh : specular highlights at f/11

Bokeh : specular highlights at f/11

Not up there with the legendary kings of bokeh, but very good and never an issue.

Close Up Performance

What’s performance like at close quarters ?

To find out, I quickly dragged out my daughter during a sunny spell in an otherwise inclement weather pacth, and made a few portrait from as close as the lens will focus : 0.7m (2.4 feet). To make matters a little more interesting, the photographs were made looking into the sun (with a red house in my back, explaining the hue of some of the reflections)

Here is f/1.4 (out of camera)

A Backlit portrait at 0.7m and f/1.4 using the Zeiss ZM 35/1.4 distagon on the Sony A7r

Backlit portrait at 0.7m and f/1.4

and a 100% crop of the eyes (the image is a bit grainy because I forgot the camera was on ISO 640 and the jpeg compression is quite strong) :

Solveig-yeux-14

Here is the same at f/5.6 (out of camera + gentle sharpening)

A Backlit portrait at 0.7m and f/5.6 using a sony Aèr and Zeiss Distafon ZM 35/1.4

Backlit portrait at 0.7m and f/5.6

Solveig-yeux-4If you’re getting the feeling f/1.4 is not as sharp, do remember the 100% enlargement is actually 2 to 3 times larger than life … You would never print that large.

Dilettante macro, anyone ?

Not close enough ? Co-author Philippe (who helped me throughout this review) has both a wicked mind and a Hawks helicoidal adapter, so while testing the lens together in Paris, we indulged in some lazy (hand-held) macro-photography with the following results.

Macro photo attempt with the ZM 35mm f/1.4 and a hawks adapter

Focused on the small flower buds, hand held


Through the aperture range

F/1.4 is your reporter mode. Entirely usable and perfectly lovely, this isn’t a marketing figure or a compromised insufficient-light-only aperture or a gooey slap-on filter. Out of my 600 frames, well 300 have been made at full aperture and benefit from it. Portraits glow (with beauty, not spherical aberration).

DSC00508-Modifier

From f/2. to f/4, the lens is at it most organic. Minor optical aberrations in various stages of lingering fail to mar the absolute beauty and subtlety of the rendition. This range accounts for 90% of my remaining frames and will represent more in the long run, when the fun of shallow DOF wears out (yeah, right ;) ) Street photographers, storytellers, reporters …

F/5.6 – f/8 are for when technical impeccability are called for. The photo entitle Calder in the garden (red arch on green foreground) and the glass house photo in the sharpness discussion are the only 2 here. Architects and landscape photographers will love these apertures as the image looses very little of it’s naturalness.

F/11 brings with it less diffraction than I had imagined but photographs feel just a little lifeless compared to other apertures, a little more “matte”, as a f/1.4.


Build & Ergonomics

Let’s get the bad stuff out of the way. Those who – like me – had hoped the Loxia offerings foretold a brighter future for Zeiss lens caps are in for a disappointment. All the cheapo ingredients we have learned to dread are well alive in this new ZM: cheap plastics, notches that manage to obstruct attachment of the cap to the metal ring of the lens then fail to keep it secure. Too small finger notches. You name it …

DSC00640-Modifier

In contrast to this, exceptional build, buttery smooth yet well damped movements, very well defined 1/3 stop aperture clicks that can be made to disappear for video usage, solid metal rings fore and aft … Cap aside, this lens is a perfect 10.

It is a matter of personal taste, but I prefer the Loxia’s modern design and abfab integration of focusing with the A7 range. However, the ZM exudes more technological luxury and belongs in the drawer with the IWC and the keys to the Carrera 4S. Brilliantly put together.


In conclusion

How do you sum up a lens such as this ?

In many ways, it is the best I have ever used, including Mamiya 7 lenses, Hasseldblad lenses, M and R mount Leica lenses, other Zeiss lenses, Fujica lenses and a few quality Nikkor offerings as well.

The subtlety of its rendering, the natural yet strong separation of colours, the stunning sharpness, the lively yet natural micro-contrast are all top of the class, whatever brand or price point you compare it with. Backlighting is dealt with with aplomb. Colours are spot on, contrast is perfect. While 35mm isn’t usually the focal length of choice for portraits, I can imagine quite a few wedding photographers will go nuts with this specific variation on the 35mm theme.

A man looks at a walking woman in a street at night. Sony A7r, Zeiss Distagon ZM 35mm f/1.4 T*

Leery

I started out my review wondering whether the Distagon 1.4/35 ZM is the missing OTUS 35. It isn’t, not by a mile. This lens is a compromise, a tradeoff in absolute technical quality for size, convenience and aesthetic qualities. I hope to be able to ask someone responsible for the design of this lens one day, but my guess is it wasn’t any easier than the OTUS to create.

Compromises mean choice.

And I do feel the decisions made here are extremely intelligent. The lens has shortcomings. Put your mind to it and you can make it look more flawed than other lenses costing half as much. But the fact is that in real life, these flaws don’t ever seem to creep into your pictures uninvited to ruin your shot unless, you are being quite unreasonable. I’ve long loved Mandler-era Leica lenses because of the beauty powder they added to life. This ZM 35/1.4 adds nothing. It removes obstacles, noise, grit and other nasties to let beauty shine naturally through in a more elegant and subtle fashion.

DSC00458What this lens is, then, is the ultimate storytelling machine. Because its focal length suits street photography, because its fully usable f/1.4 aperture creates a look and helps the grabber, and – mainly – because it reveals so much of the nuances and subtleties that caused the photographer to click in the first place.

Is it worth its asking price ?

Beam on the beemer

Beam on the beemer

Considering the ZM 35/1.4 provides all the niceties of a Summilux 35/1.5 FLE at barely more than half the cost and with far fewer compromises (on the Sony A7 range), the answer would seem to be a resounding YES. But the answer really depends on what you like in a lens and in photography in general. This is a lens that delivers delicacy, subtlety and realism in spades. Which leaves you – the photographer – with a lot to do to add personality to the photographs. When the Leica Monochrom was released, many were disappointed at how grey and dull the images it produces are. What some love (the huge dynamic range) others loath (a lot of work to extract the best out of the file). It takes work and experimentation to shine.

This situation is somewhat similar with this Distagon. It reduces the noise floor, lets the micro detail play their role in quality art and asks the photographer for a minimum of common sense and vision to extract the best it can offer.

Placed in a lab against lenses designed for sharpness at the expense of life, it will fail to convince those who live by corner lp/mm figures (on the A7r, that is). In the hands of a lover of natural beauty – regardless of skill level – it will bring out the best in the scene it is pointed at. I love it!

Under the Grande Arche de La Défense, Paris. ZM 35/1.4, Sony A7r

Under the Grande Arche de La Défense, Paris. ZM 35/1.4, Sony A7r

At the end of the day, the lens has to be bad news for Zeiss. Not only will nitpickers pick nits for zilch, but artists will buy this lens and never use anything else again. Zeiss can actually close shop today. I wonder if they’ll notice when I don’t send the loaner back …


Posted on DearSusan by pascaljappy.

#321. High-end 35mm lens shootout: Zeiss Distagon T* 1.4/25 ZM vs Leica Summicron 35/2 vs Sony/Zeiss FE 35/2.8

$
0
0

Dilemma. Having worked hard to establish what a formidable image-making machine the Zeiss Distagon T* 1.4/35 ZM is (see also here), I hesitate to feed it to a pixel-peeping community with shots made on a Sony A7r, a camera for which it wasn’t designed and on which it shows technical shortcomings that some will blow out of proportion.

However:

(1) I promised I would.

(2) The readers who are really interested in buying a 2000€ standard-wide will know what to make of what they see. What matters and what doesn’t.

(3) Even when pixel-peeped at, this is a great lens.

So, here we are with the ZM 35/1.4, the Sony-Zeiss Sonnar 35/2.8 FE and my battered old Leica Summicron 35/2. In the 90 minutes I managed to stay outside in the cold, I was able to make pictures for the following comparisons : infinity, close up and colours.

For other aspects of the challenger lenses, you can find reviews elsewhere on this site :


Infinity comparison

Infinity focus provides the worst-case scenario for M-mount lenses on the Sony A7r  because their rear lenses are closest to the sensor (and on the ZM 35/1.4, that is scary close!). I chose the scene below because it is a real torture test for all lenses: backlit, low-contrast and with a distinct blue cast.

Here is a B&W converted image, followed by the aperture series for all 3 lenses, uncorrected and all full-size.

The Sainte-Baume Massif in Provence - our "Infinity" target

The Sainte-Baume Massif in Provence – our “Infinity” target – Sony A7r & Zeiss ZM 35/1.4 @ f/5.6

What to look for ?

  • As you can see, a monastery is build on the cliff and a small building sits just above it on the ridge. Both have plenty of interesting detail to check out.
  • Below that, the forest provides very fine and low-contrast detail in the branches. This is a much tougher test than black and white lines in a well-lit lab.
  • The ridge is good for chromatic aberration
Zeiss 35/1.4 ZM Leica Summicron-R 35/2 Sony-Zeiss FE35/2.8
f/1.4 DSC00786-2  N/A  N/A
f/2 DSC00787-2 DSC00798-2  N/A
f/2.8 DSC00788-2 DSC00799-2 DSC00793-2
f/4 DSC00789-2 DSC00800-2 DSC00794-2
f/5.6 DSC00790-2 DSC00801-2 DSC00795-2
f/8 DSC00791-2 DSC00802-2 DSC00796-2
f/11 DSC00792-2 DSC00803-2 DSC00797-2

What does this tell us?

  • Don’t shoot landscape at infinity and f/1.4 (duh ;) ) The Summicron 35/2 and FE 35/2.8 need f/5.6 to be really happy and the ZM requires another stop.  From f/2.8 on, the ZM 35/1.4 seems the best in the center. The FE 35/2.8 is the best in the edges, throughout the comparison.
  • The 30 year-old Summicron is off the mark, colour-wise. It also seems to have a more curved field than the 2 others, see the green pine trees on the right (the FE feels like it has a flat field, the Summicron inward curving and the ZM slightly outward curving). It also has a slightly wider field of view, compared to the two others.
  • Chromatic aberration on the ZM is, how to put it, rather strong …
  • Unsurprisingly, as the only lens optimised for the Sony camera, the FE 35/2.8 is the best all-round performer on this “simulated lab” exercise.

Note: If it’s taking you time to compare 2 photos at 100% (6-9 foot-wide, depending on your screen), it probably means the differences are absolutely meaningless on a 16″ print ;)


Close up comparisons

Different target, different goals. Here is a bush with no definite outline against a background of the same colour. Which lens separates the bush from the background best? Which has the best colour and the best bokeh?

Zeiss 35/1.4 ZM Leica Summicron-R 35/2 Sony-Zeiss FE35/2.8
f/2.8 DSC00847 DSC00851 DSC00849
f/5.6 DSC00848 DSC00852 DSC00850

At close range, the ZM 35/1.4 is a much happier camper. Yes, its corners still suffer at f2/.8 but the whole picture is superb with better colour than the Summicron 35/2, better bokeh than either competitor and ma more lifelike rendition of all twigs and branches. As far as I can tel, it is the best of the lot, the FE 35/2.8 coming up last, a bit lifeless.

This test also reveals the limits of autofocus, which locks on something, though I am not always sure what. Whereas both manual focus lenses are spot on.


Colour performance

This final test is more about colour and tonal rendition. Here are 3 scenes photographed with each lens in turn (hand-held).

What the photos don’t show is that shutter speed is always 1/3 stop faster FE 35/2.8 ZA.

Scene 1 : Backlit oaks with ruddy leaves and frost on grass.

ZM 35/1.4 @f/4

ZM 35/1.4 @f/4

DSC00772

Summicron-R 35/2 @ f/4

DSC00771

FE 35/2.8 ZA @f/4

All 3 are lovely. The Summicron seems to add a slight green cast to the scene and seems a bit flater (look around the bottom of the trunk). I’d hesitate between the FE35/2.8 and ZM 35/1.4 for best image here, but the ZM does look a bit ahead on micro-contrast (again, all the area arounf the trunk is telling).


Scene 2 : Exact same spot, looking 120° to the right. Same conditions, flatter side lighting.

DSC00776

ZM 35/1.4 @f/4

Summicron-R 35/2 @f/4

Summicron-R 35/2 @f/4

DSC00775

FE 35/2.8 @f/4

Again, 3 great results with the Summicron-R coming in 3rd because of slight cast, particularly visible on the grass below the brown tree. The other two are virtually indistinguishable, but the bottom left corner is a bit more mushy on the ZM’s rendering. The FE 35/2.8 gets this one.


3rd scene: building in the shadow

ZM 35/1.4 @f/4

ZM 35/1.4 @f/4

Summicron-R 35/2 @f/4

Summicron-R 35/2 @f/4

FE 35/2.8 @f/4

FE 35/2.8 @f/4

Here, the Summicron’s cast and greatest field of view (shortest true focal length) are most obvious. The other two are very close, with slightly better exposure on the FE 35/2.8.


4th scene: a small cemetery in the shadow. Focus on 2nd cross form the left, closest row.

DSC00782

ZM 35/1.4 @f/4

DSC00781

FE 35/2.8 @f/4

Summicron-R 35/2 @f/4

Summicron-R 35/2 @f/4

Again, the Summicron seems greener and a tad more muffled. I like the tree on the left best on the ZM, the rest being difficult to tell apart from the FE’s rendering. The FE does seem to have greatest depth of field at f/4, with the background appearing sharper, which is not necessarily a good think for 3D pop a f/4. The ZM takes this round but the differences are very small.

And your tastes/mileage may vary :)


Conclusion

Although I love that lens dearly, the Summicron seems a bit distanced in this company. It’s an older design, not optimised for the Sony 7r (or for digital, for that matter) and, while it holds its own and shines in the sharpness comparisons, its colour and liveliness are a bit less convincing. It also suffers from coma and odd bokeh (see review: Leica Summicron 35/2).

The FE 35/2.8 ZA is a superb lens. I said so a year ago and still think so, even compared to the landmark ZM. At infinity, it comes out on top. At close range, falls to a very relative bottom. In terms of colour and dynamism, it’s almost on a par with the superb ZM. Ergonomics, well … Not in the same league. This is a plastic-feeling lens, and an AF design that leaves you very limited control on the lens itself. Some like that, others don’t. For the price, it is a no-brainer and could be my only lens. But it is 2 stops slower than the ZM, and not always quite as lovely and natural feeling. Brilliant lens, nonetheless (see review:  Sony Zeiss 35/2.8 FE)

Grand Randonnée - @f/1.4

Grande Randonnée – Zeiss Distagon 35/1.4 ZM @f/1.4

Which leads us to what may be the world’s best 35mm lens, period.

How can I recommend so highly a lens with such average sharpness performance at infinity, some will ask. Have you ever cycled? Not your leisurely stroll to the bread shop. I mean on a tough mountain bike or high-end road bike, doing arduous long-distance rides. If so, have you ever complained about your bike’s ability to shift while on the largest chainring and largest sprocket? Or both the smallest ? No, of course not. Because nobody rides that way.

Well, almost noone photographs landscapes at infinity and full aperture. And if a very, very, special application (astrophotography comes to mind, for instance) requires you to, I recommend a thinner filter stack or a different lens. Other than that, wide apertures in landscapes are more often used to isolate a subject close up from the background, an exercise at which the ZM fares much better. As you can tell from the photograph above, missing focus is more likely to be an issue than lens performance ;) But see how the twigs on the left of trunk are OK ? Not perfect, but quite OK (this is one of the pictures that make me believe the ZM 35/1.4 has an outward-curving best-sharpness surface, by the way). For better results than that at f/1.4, a new filter stack is needed (and tempting).

Concluding the conclusion : for the money, on the A7r, the FE35/2.8 may just be the best all-rounder, but it is “only” f/2.8 and the AF configuration doesn’t agree with me much. It truly is a superb lens. The Summicron, I like and keep for review comparisons and because of the more abstract look it gives to certain scenes. The ZM is the one my heart really wants and the one my wallet will open up for, unless the Loxia proves to be a real champ when I finally get hold of one. The real question is whether to change my camera’s filter stack or not … I need help ;)


Posted on DearSusan by pascaljappy.

Viewing all 135 articles
Browse latest View live